NUS Event Mailer Pro User Guide
NUS Event Mailer Pro (NUS EMP) is a desktop app for event organizers at NUS to manage hundreds of events and contacts quickly and easily. It's designed for speed and simplicity, as most actions can be done by typing commands directly, allowing you to work quickly without relying on menus or complex navigation.
We assume that you can type fast but still want a well-designed interface, in which case NUS EMP is perfect for you! No programming knowledge will be needed, but some basic computer skills like using terminals, downloading files, will be required for you to run the app.
1. Getting Started
1.1 Installation
Check if you have Java 17 or newer on your computer. If you're unsure, check our FAQ section for help.
Note: for Mac users, you'll have to get the specific Java version described hereDownload the app from our releases page
Save the file in any folder you like - this will be your app's home
Start the app: Open a terminal, go to that folder using the
cdcommand, and type:java -jar nus-emp-v1.6.jarIf you're unsure of how to use the
cdcommand, check out the FAQ section for help.Finish installation: You'll see the app window appear with some sample contacts and events!
Pro Tip: Start by typing help or pressing the help button to see this guide anytime you need help!
1.2 Command Formats
Commands are simple instructions you type to tell the app what to do. Here's everything you need to know:
Basic Command Usage
- Type in lowercase letters
- Press Enter after typing
- Some commands need extra info (like a name or number)
- Open command terminal with CTRL+T or the ⌘ button
Understanding Command Formats
Words in UPPER_CASE are parameters you need to replace
e.g. incontact add --name NAME, replaceNAMEwithJohn DoeItems in [square brackets] are optional
e.g--name NAME [--tag TAG]can be used as--name John Doe --tag friendor just--name John DoeItems with
…can be used multiple times (including zero times)
e.g.[--tag TAG]…can be used as--tag friend --tag familyor no tag at allParameters can be in any order
e.g.--name NAME --email EMAILworks the same as--email EMAIL --name NAMEExtra parameters are ignored for simple commands like
helpandexit
e.g.help 123is treated as justhelp
Parameter Shortcuts
Save time with these short forms:
| Long Form | Short Form |
|---|---|
--name | -n |
--email | -e |
--phone | -p |
--address | -a |
--tag | -t |
--date | -d |
--contact | -c |
--event | -e |
--status | -s |
Note
The parameters --events and --email are not used in the same command, so it is okay for both to use -e as the short form.
Complete Example
Long form:
contact add --name John Doe --email john@email.com --phone 91234567 --tag friend
Short form:
contact add -n John Doe -e john@email.com -p 91234567 -t friend
Important Note for PDF Users
If you're using a PDF version of this guide, be careful when copying and pasting commands that span multiple lines - space characters around line-breaks might be lost when copied to the app.
1.3 Input Constraints
Each field in NUS EMP has specific requirements to ensure data quality. Here are the constraints for each field:
Contact and Event Fields
| Field | Constraints | Examples |
|---|---|---|
| Name (Contact) | Cannot be blank. Can contain any character. | John Doe, Mary-Jane O'Brien, 李明 |
| Name (Event) | Cannot be blank. Can contain any character. Must be unique - no two events can have the same name. | Team Meeting, Orientation 25/26, Annual Dinner 2025 |
Must follow format: local-part@domain- Local part: alphanumeric and + _ . - only, cannot start/end with special characters- Domain: must end with at least 2 characters, labels separated by periods - Case-insensitive for uniqueness (e.g., John@Email.com = john@email.com) | john@email.com, mary.jane@company.co.uk, user+tag@domain.org | |
| Phone | Cannot be blank if provided. Can only contain standard characters, i.e. characters you can type on a standard US keyboard. | 91234567, +65 9123 4567, 123-456-7890 |
| Address | Cannot be blank if provided. Can only contain standard characters. | 123 Main Street, Blk 123 #01-01, Apt. 5B |
| Tag | Cannot be blank. Can only contain standard characters. Case-insensitive. If duplicate tags are entered, only the tag defined first will be saved. | friend, high-priority, VIP++, follow up |
| Date | Format: DD-MM-YYYY HH:MM (24-hour time) | 25-12-2025 14:30, 01-01-2026 09:00 |
| Event Status | Must be one of: PENDING, ONGOING, DONE (case-insensitive) | pending, ONGOING, Done |
| RSVP Status | Must be one of: available, unavailable, unknown (case-insensitive) | available, UNAVAILABLE, Unknown |
| Index | Positive integer within the displayed list range | 1, 2, 50 |
Common Mistakes to Avoid:
- Using invalid date formats (must be
DD-MM-YYYY HH:MM) - Using invalid email formats (must follow
local-part@domainstructure)
1.4 User Interface Overview
The NUS Event Mailer Pro interface is designed to be intuitive and efficient for managing your events and contacts.
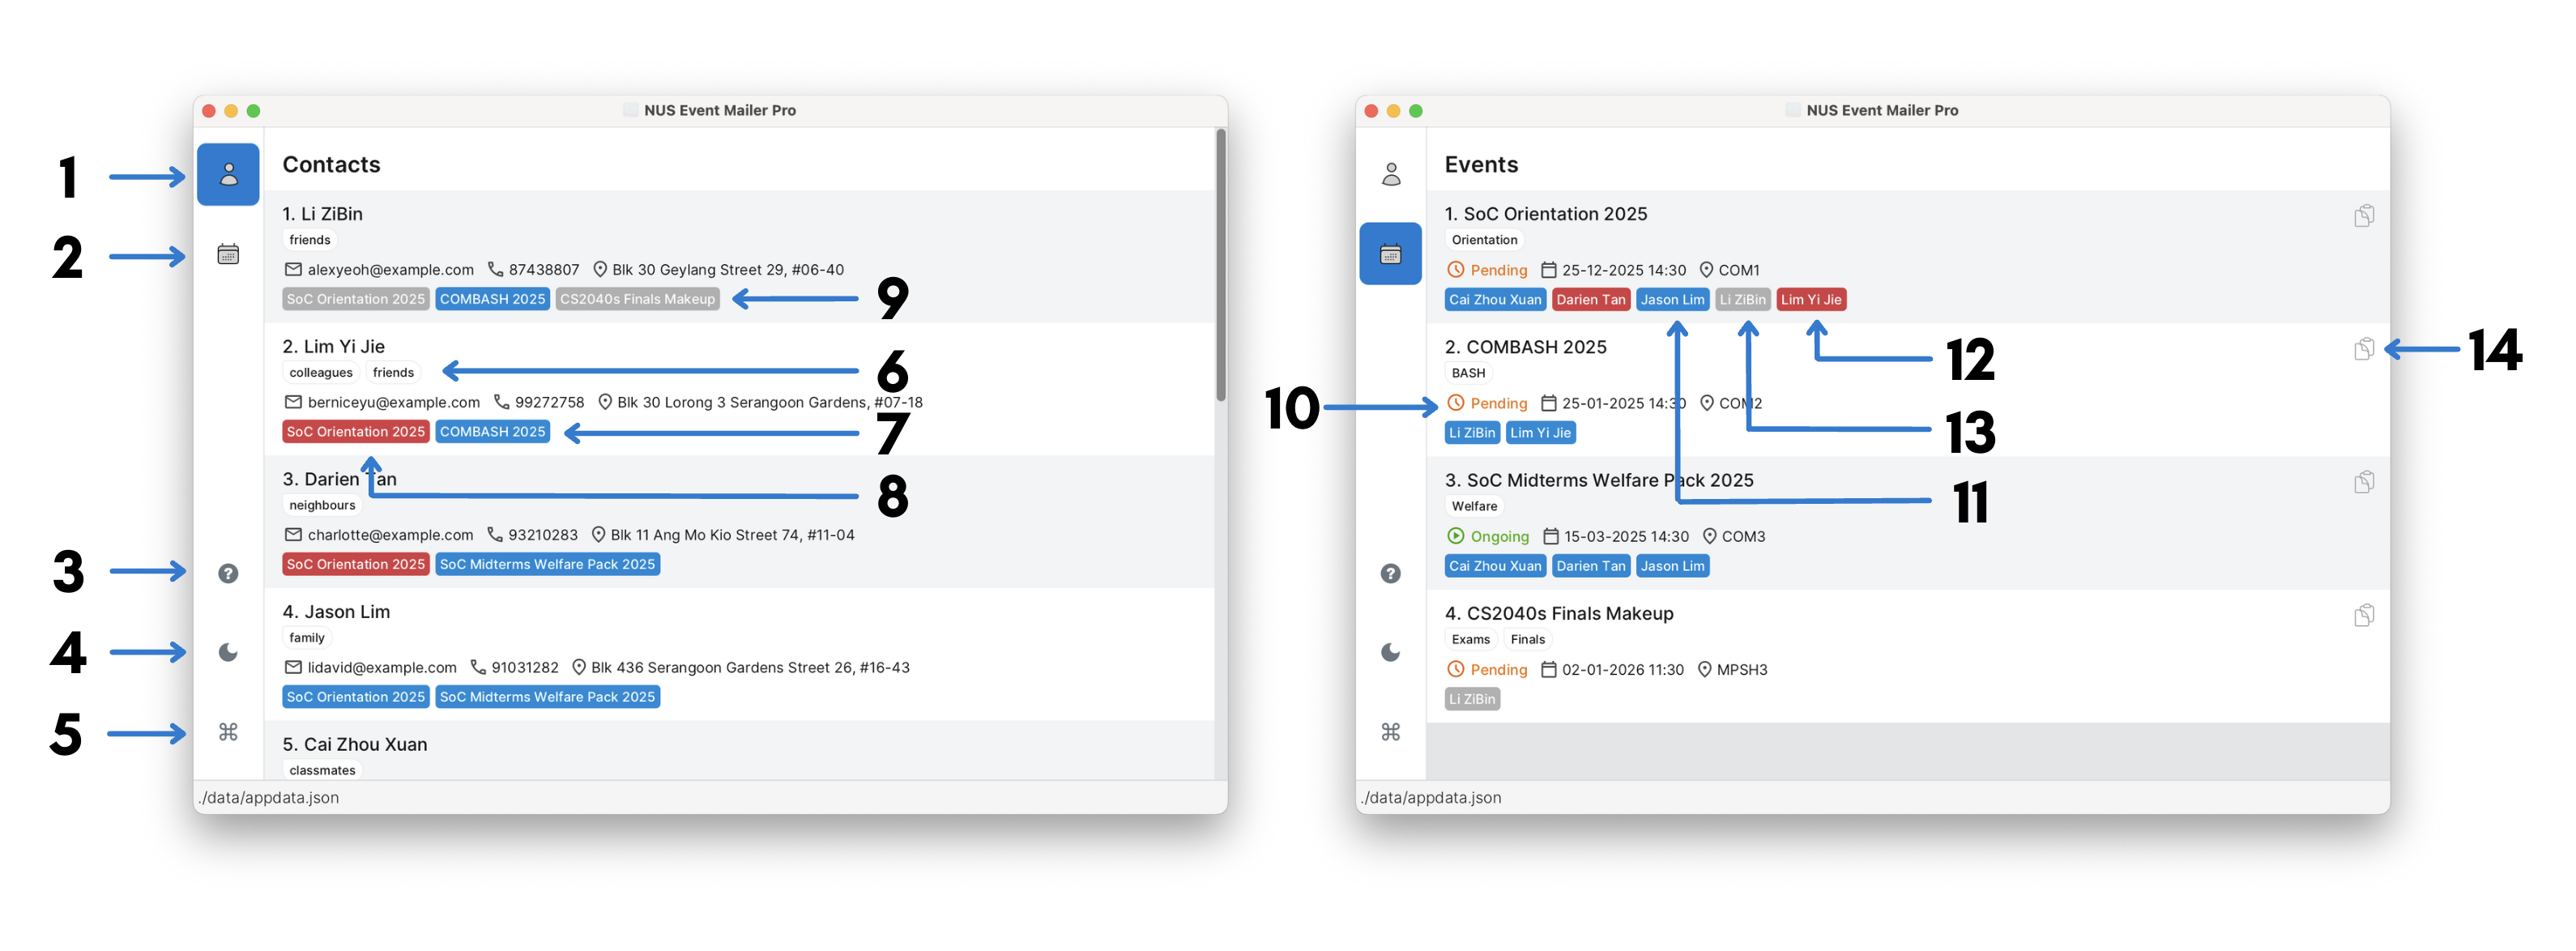
Main Interface Components
| # | Description |
|---|---|
| 1 | Contact view button |
| 2 | Event view button |
| 3 | Help button, opens the user guide in your browser. |
| 4 | Button to toggle light and dark mode. |
| 5 | Button to toggle command terminal (Alternatively, open with CTRL-T). |
| 6 | Contact tags |
| 7 | Contact's linked events (Available) |
| 8 | Contact's linked events (Unavailable) |
| 9 | Contact's linked events (Unknown) |
| 10 | Event's status (Pending/Ongoing/Done) |
| 11 | Event's linked contacts (Available) |
| 12 | Event's linked contacts (Unavailable) |
| 13 | Event's linked contacts (Unknown) |
| 14 | Quick export button (Exports emails of all available contacts) |
Key Features
- Real-time Updates: Contact and event lists update immediately after commands
- Sample Data: The app starts with sample contacts and events to help you learn
- Responsive Design: The interface adapts to different screen sizes
- Visual Feedback: Commands show clear success/error messages
- Quick Access: Frequently used actions are available through the sidebar
Navigation Tips:
- Click on contacts or events to select them (when applicable)
- Scroll through long lists using the scroll bar or arrow keys
- Use the command terminal for quick actions rather than navigating menus
2. Managing Your Contacts
2.1 contact add
Save someone's information so you can invite them to events later.
What you need:
contact add --name John Doe --email john@email.com
Add more details if you want:
contact add --name Jane Smith --email jane@company.com --phone 91234567 --address 123 Main Street --tag friend --tag colleague
Helpful Tips:
- Add multiple tags by repeating
--tag - You can mix up the order of information
- Only name and email are required - everything else is optional!
Format:
contact add --name NAME --email EMAIL [--phone PHONE] [--address ADDRESS] [--tag TAG]…
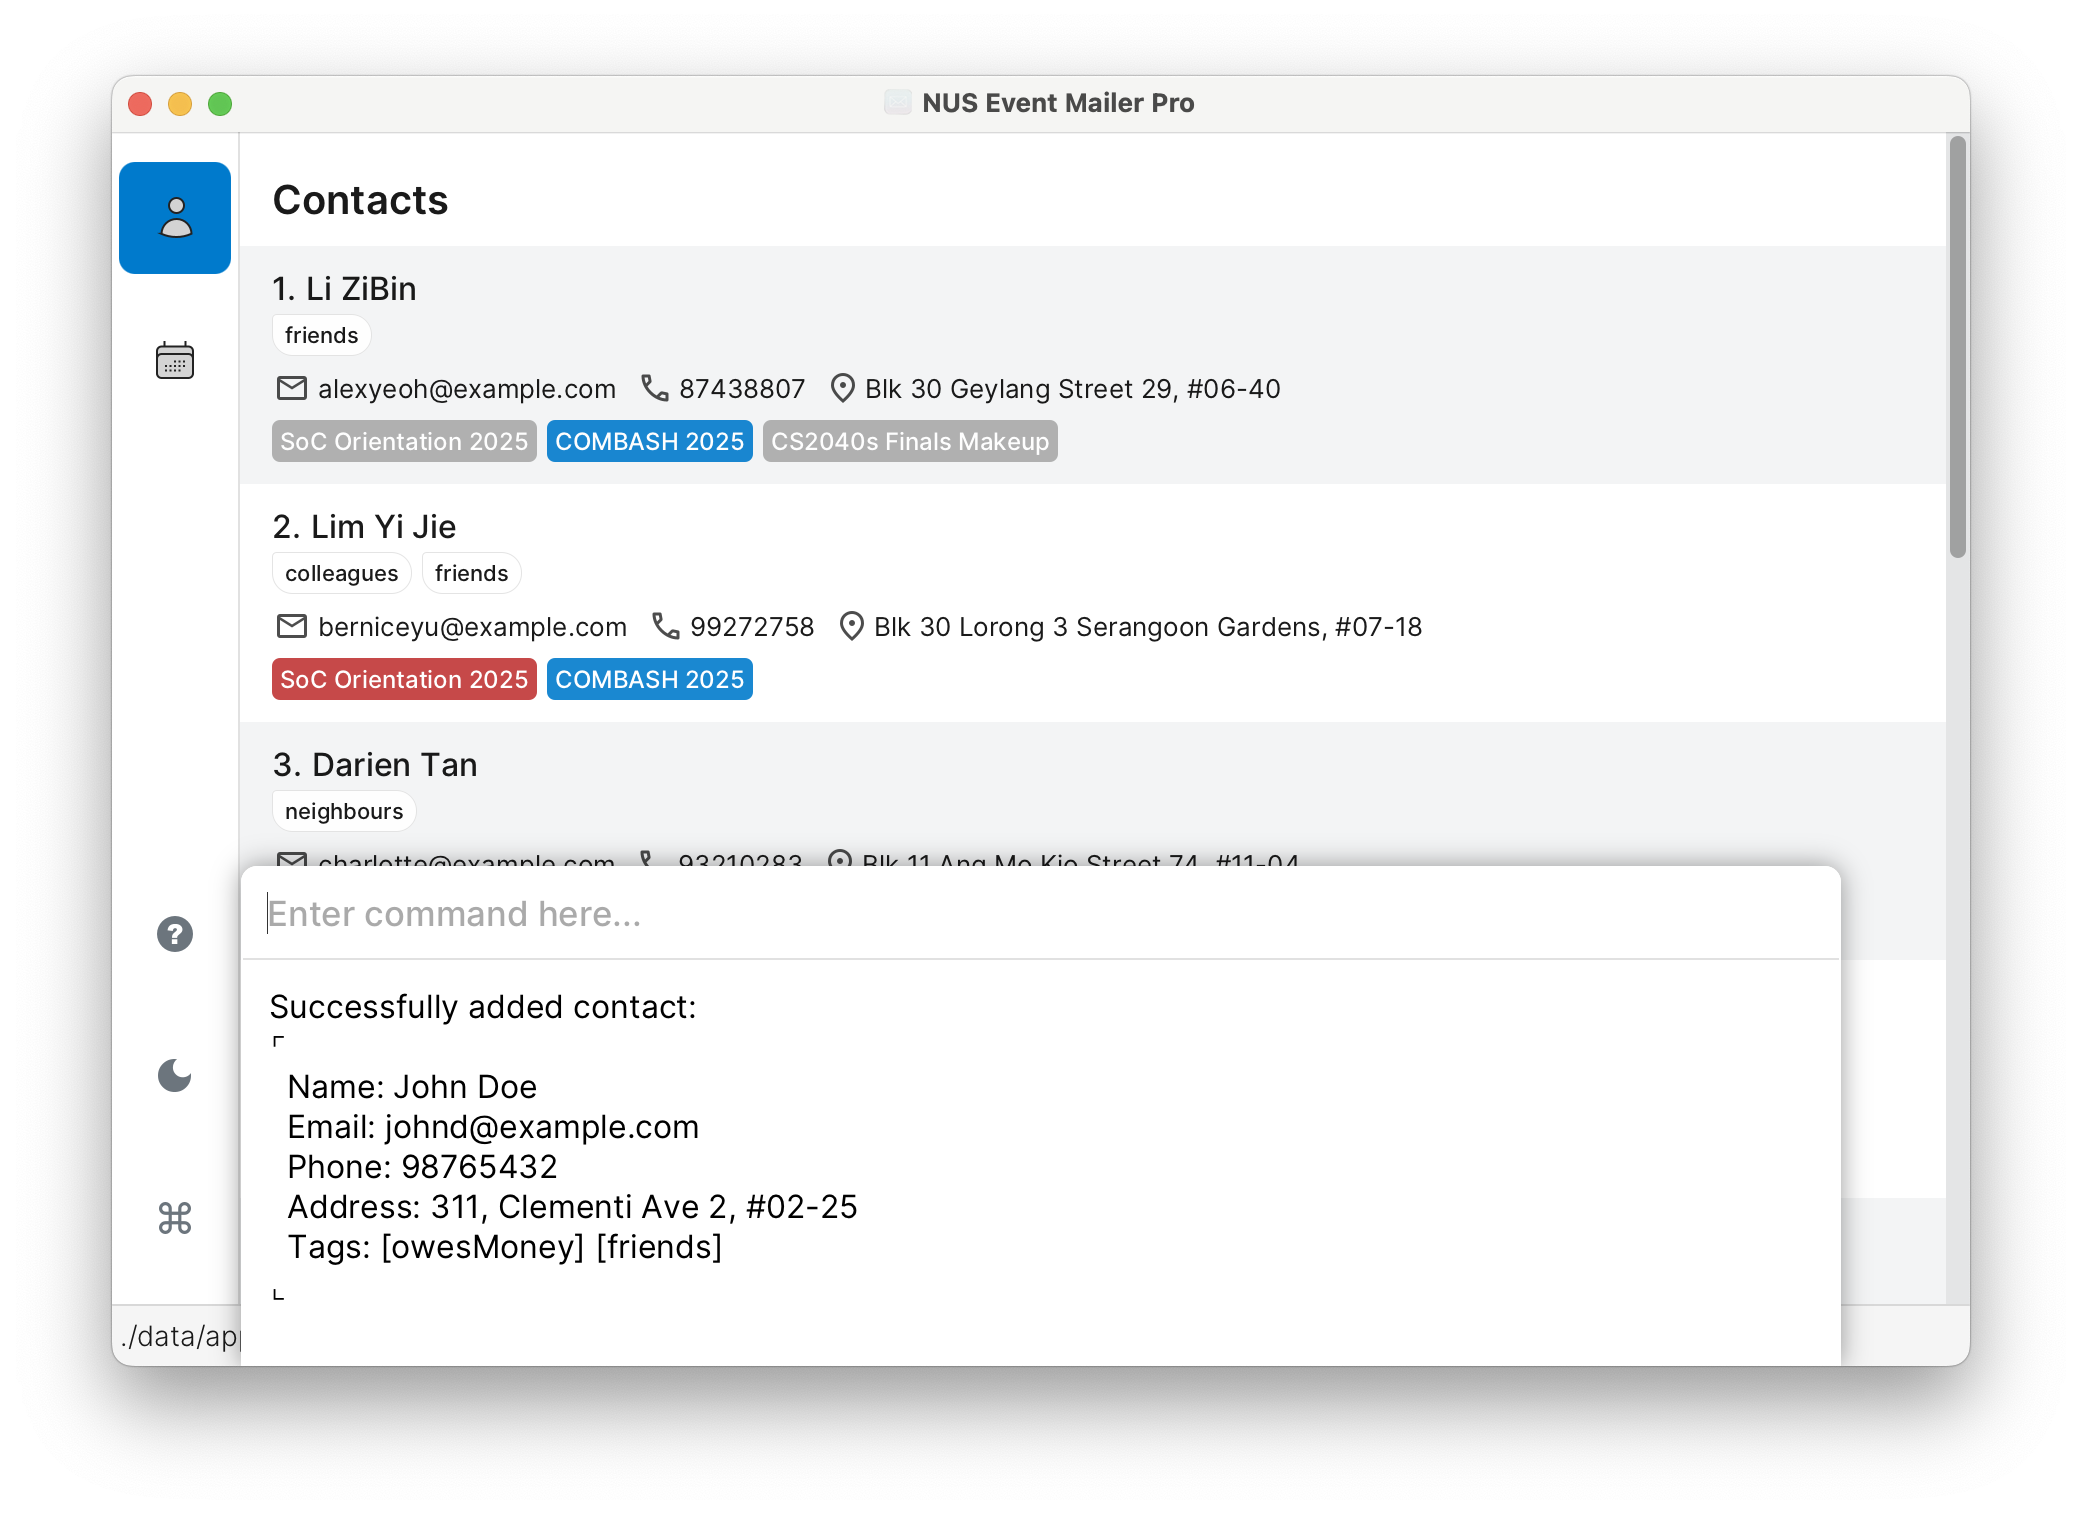
Screenshot Example:
2.2 contact list
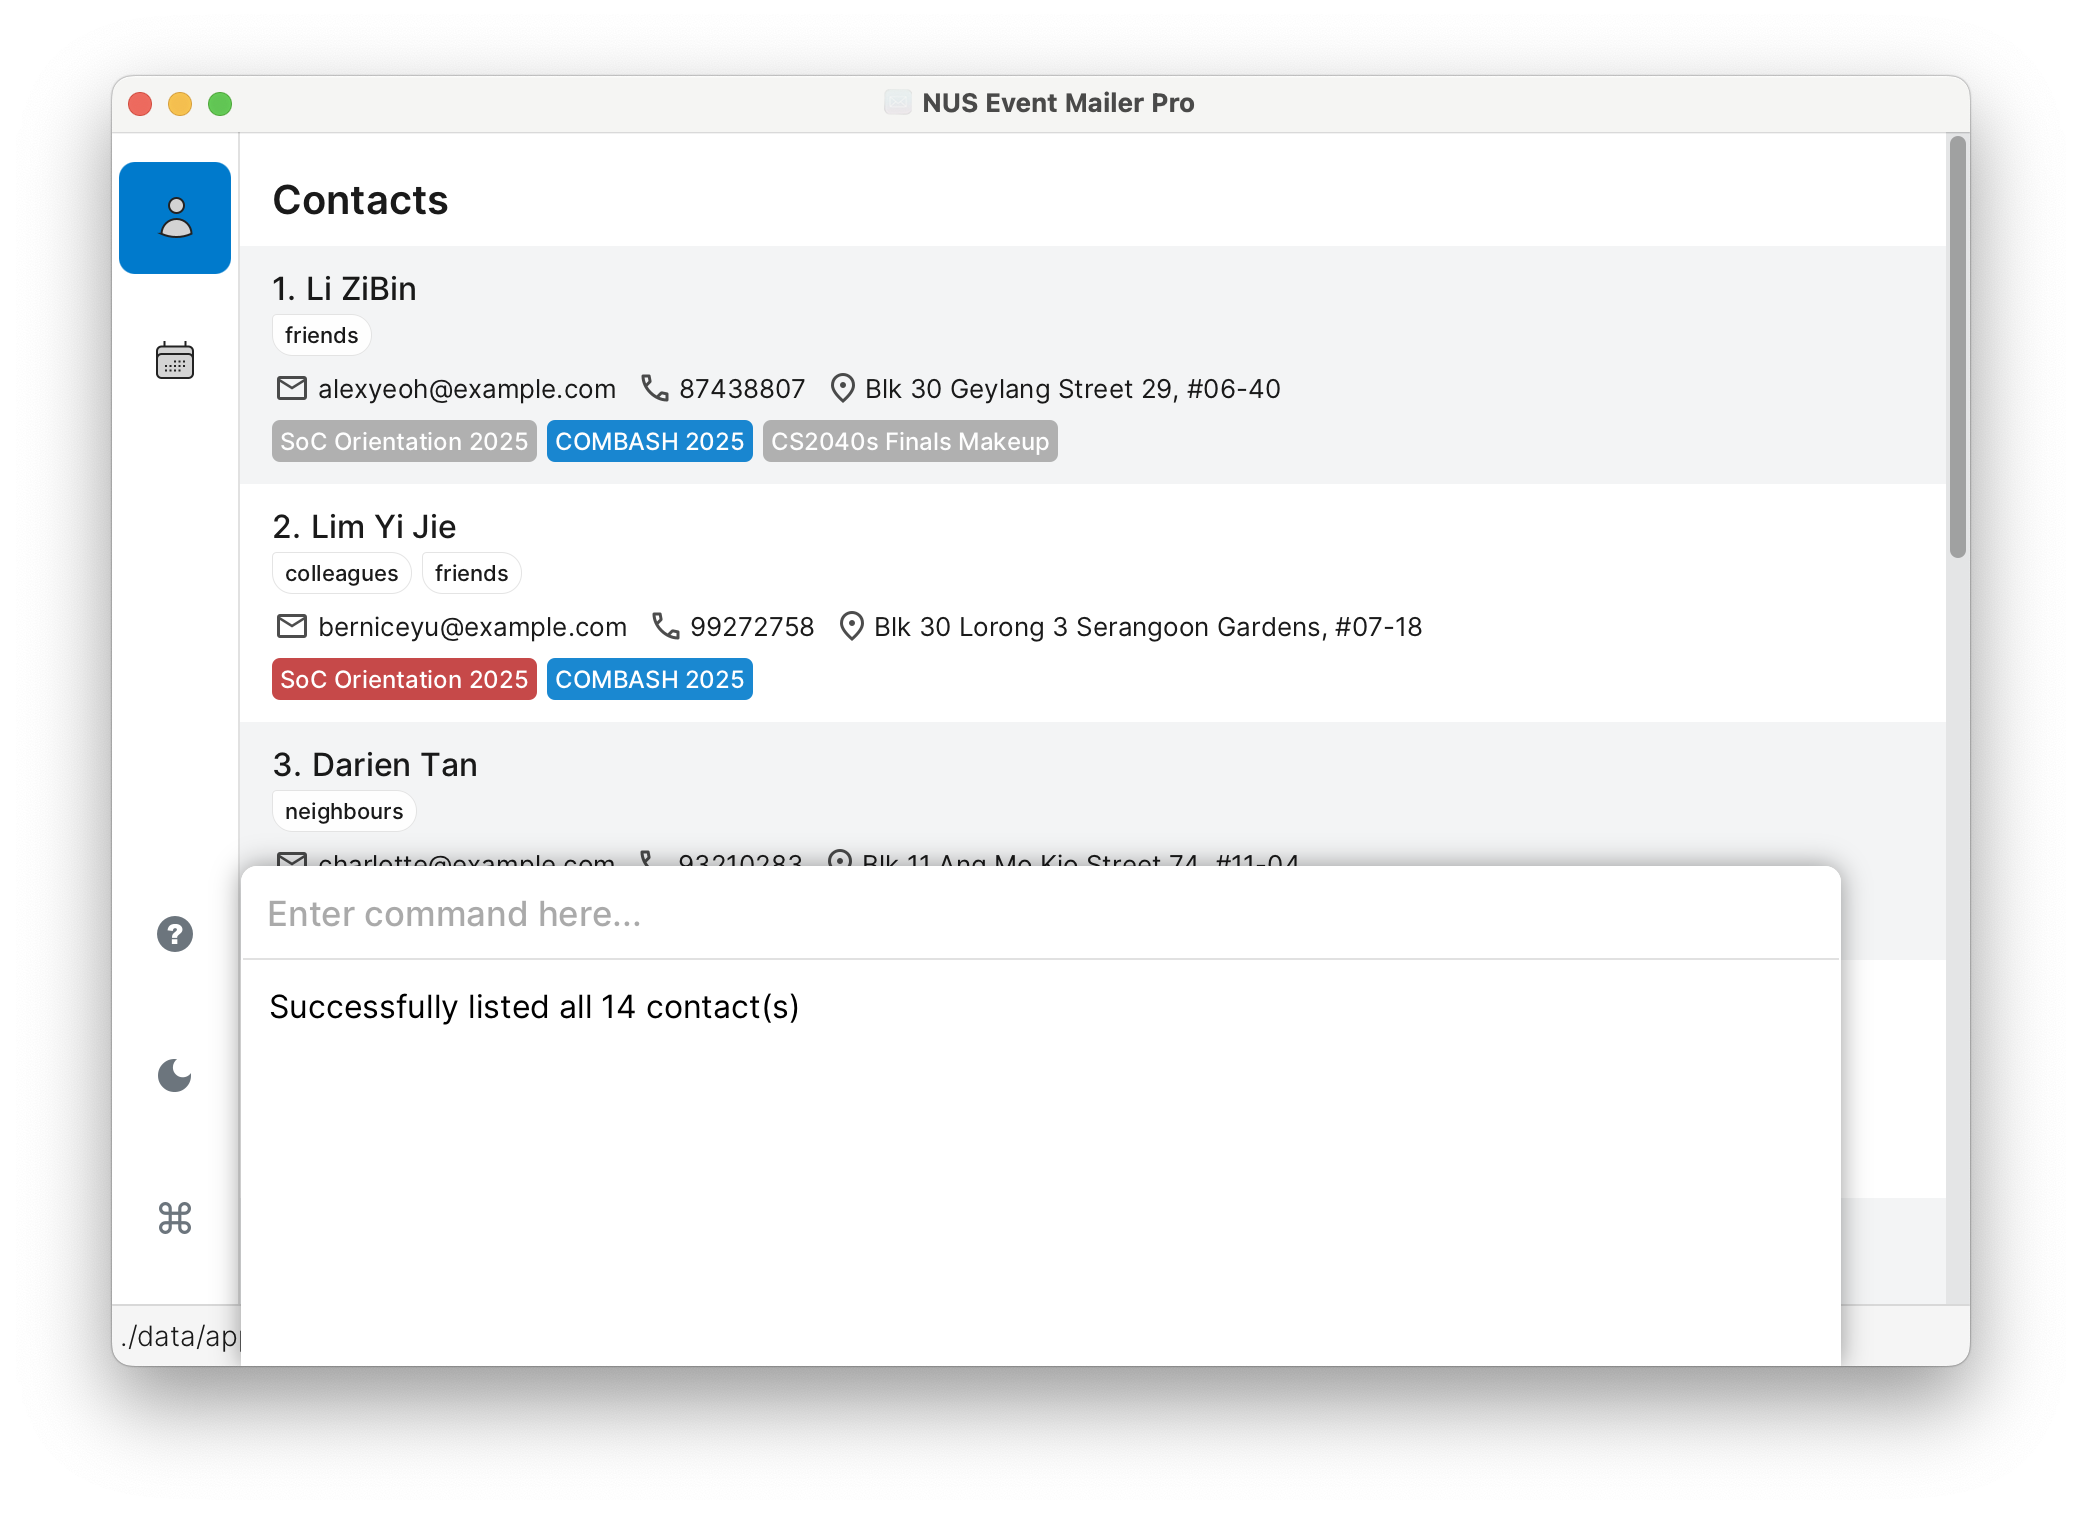
See everyone you've saved:
contact list
What You'll See:
- Contacts in the order you added them
- Each contact has an index number (Note this down - you'll need it!)
- Use scroll bar or arrow keys if you have lots of contacts
Screenshot Example:
2.3 contact edit
Update someone's details when their information changes.
How to do it:
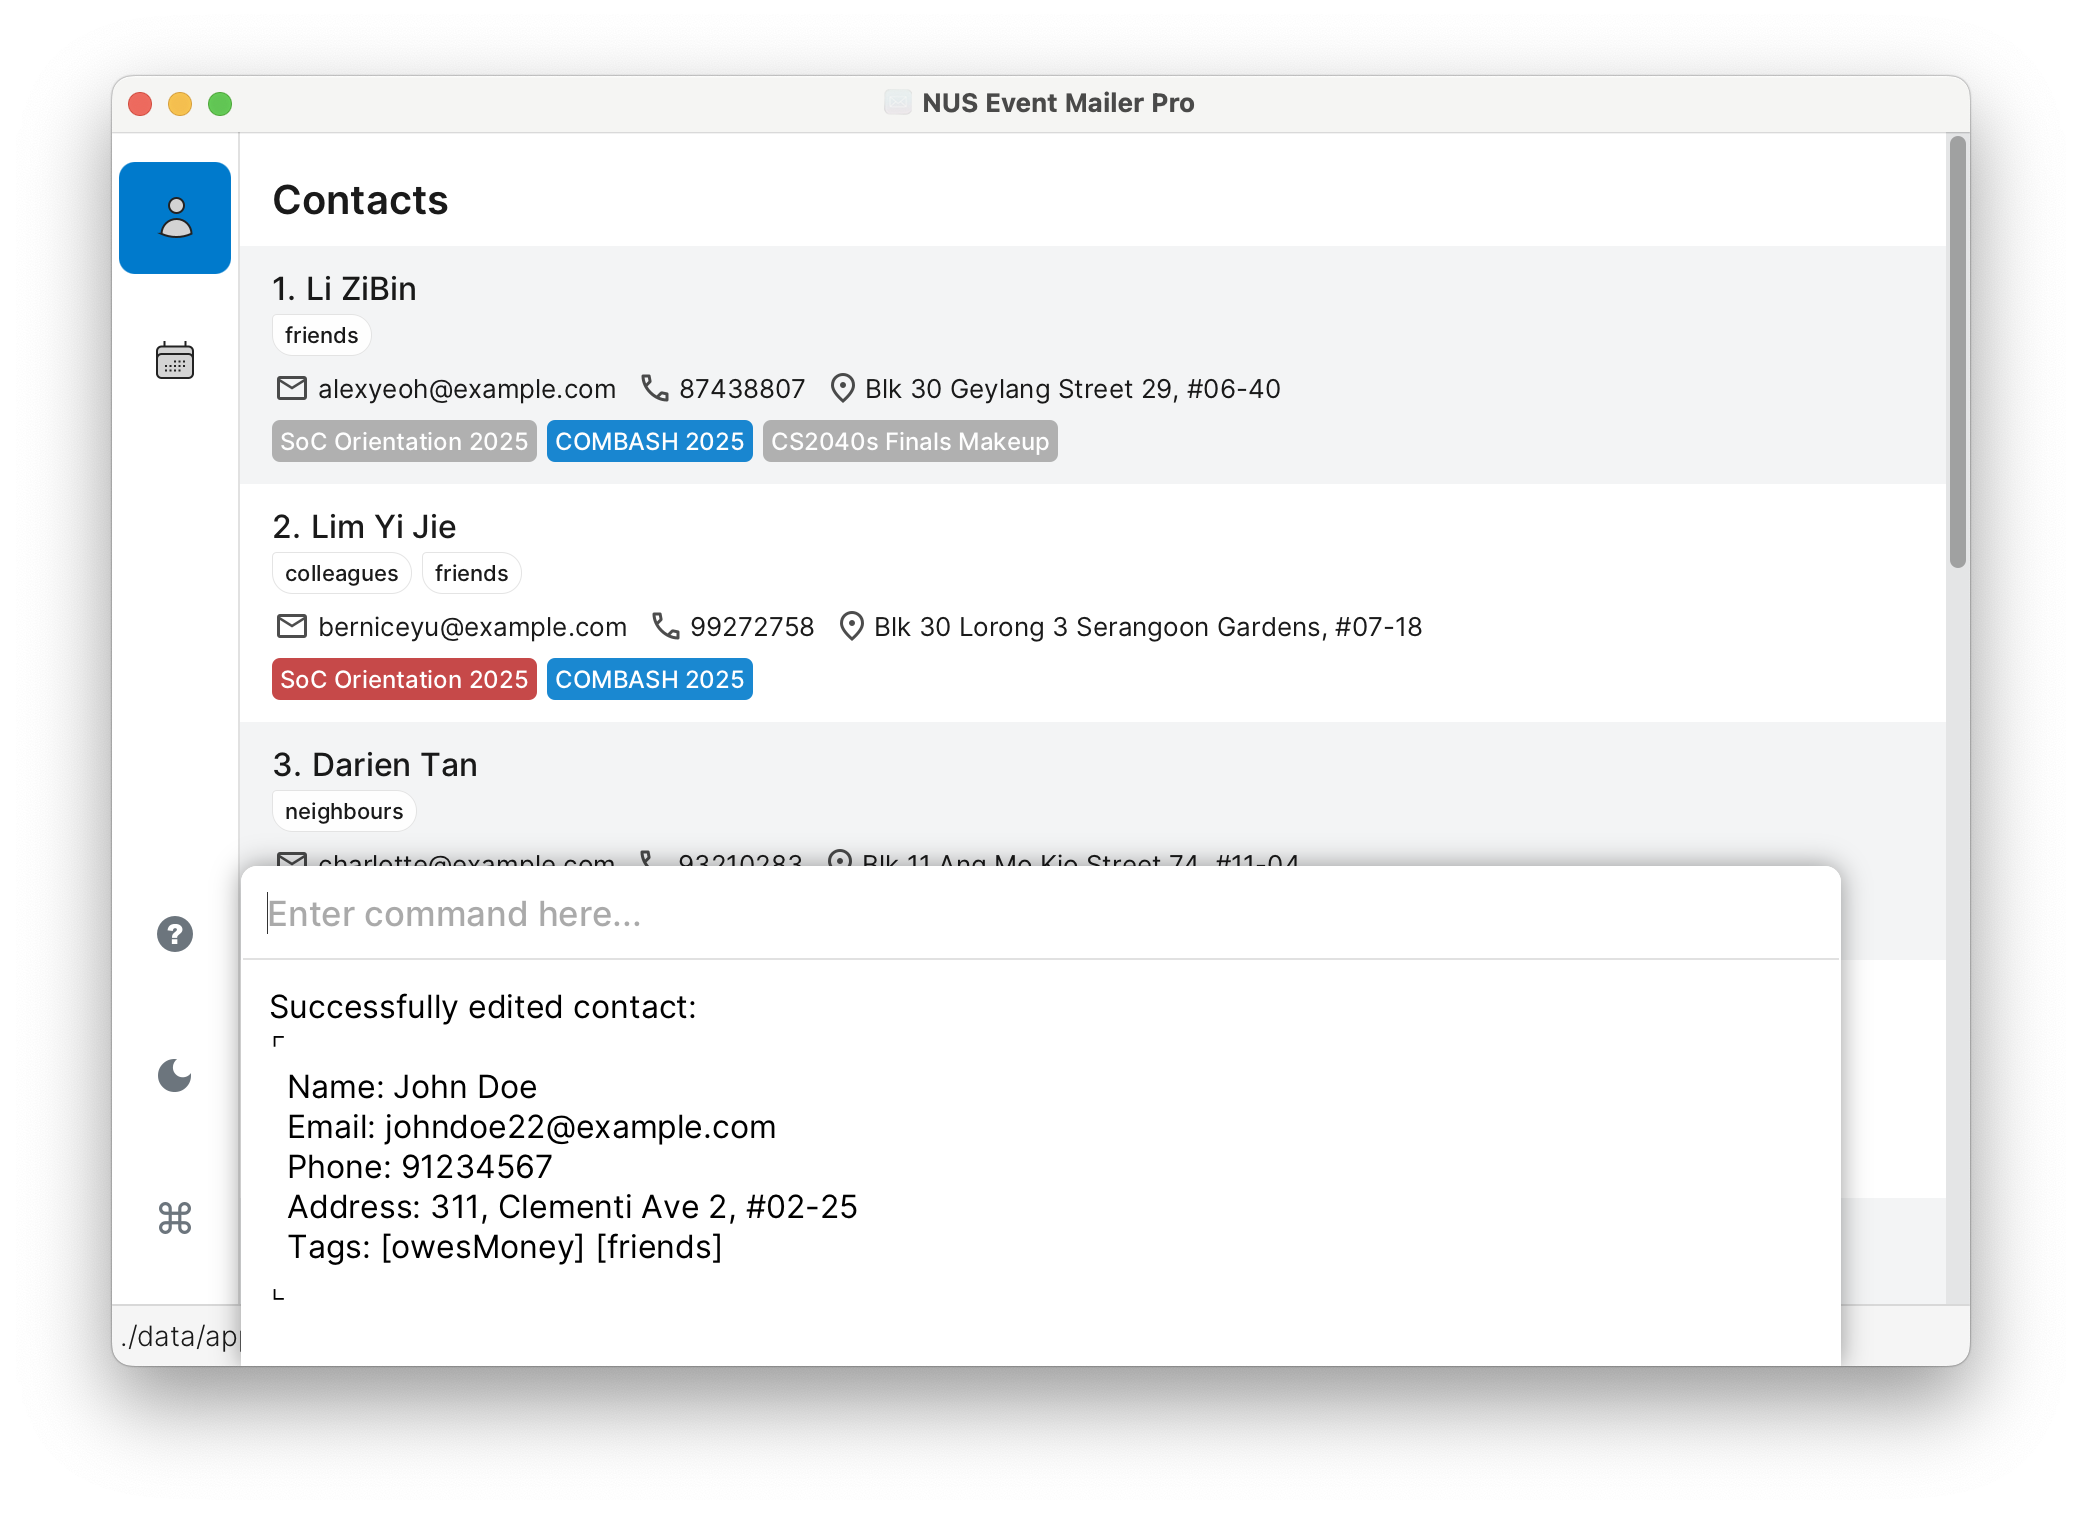
contact edit 1 --phone 98765432 --email newemail@gmail.com
This changes contact #1's phone and email.
Important: You can find the index of the contact in the displayed contact list. The index should be a positive number.
Important to Know:
- You can leave optional fields empty to clear them:
contact edit 1 --phone - Name and email can't be cleared (they're always needed)
- All the tags will be replaced if you provide new ones
- You can remove all tags with:
contact edit 1 --tag - You must change at least one thing
Format:
contact edit INDEX [--name NAME] [--email EMAIL] [--phone PHONE] [--address ADDRESS] [--tag TAG]…
Screenshot Example:
2.4 contact find
Looking for someone specific? You can search in different ways:
Simple name search:
contact find John
Search by specific information:
contact find --email gmail
contact find --phone 9123
contact find --address serangoon
contact find --tag friend
Combine searches:
contact find --name alice bob --email nus.edu ntu.edu
- Doesn't matter if you use capital or small letters
- Partial matches work (typing
gmailfinds@gmail.com) - Multiple words in one field use OR logic
- Different fields use AND logic
- Perfect for finding everyone from the same school or area!
Understanding Search Logic:
OR Logic (within one field): Finds contacts matching ANY of the words
contact find --name alice bob
Finds contacts named alice OR bob
AND Logic (between fields): Finds contacts matching ALL the conditions
contact find --name alice --email gmail
Finds contacts named alice AND have gmail in their email
Simple Example:
contact find --name alice bob --email gmail
Finds: People named alice OR bob AND who have gmail in their email
Note: After using contact find, same contacts will likely have different index numbers when compared to using contact list. Remember to use these displayed index numbers instead when running commands on the found contacts.
Format:
contact find KEYWORD [MORE_KEYWORDS]… or contact find [--FIELD KEYWORD [MORE_KEYWORDS]…]…
Screenshot Example:
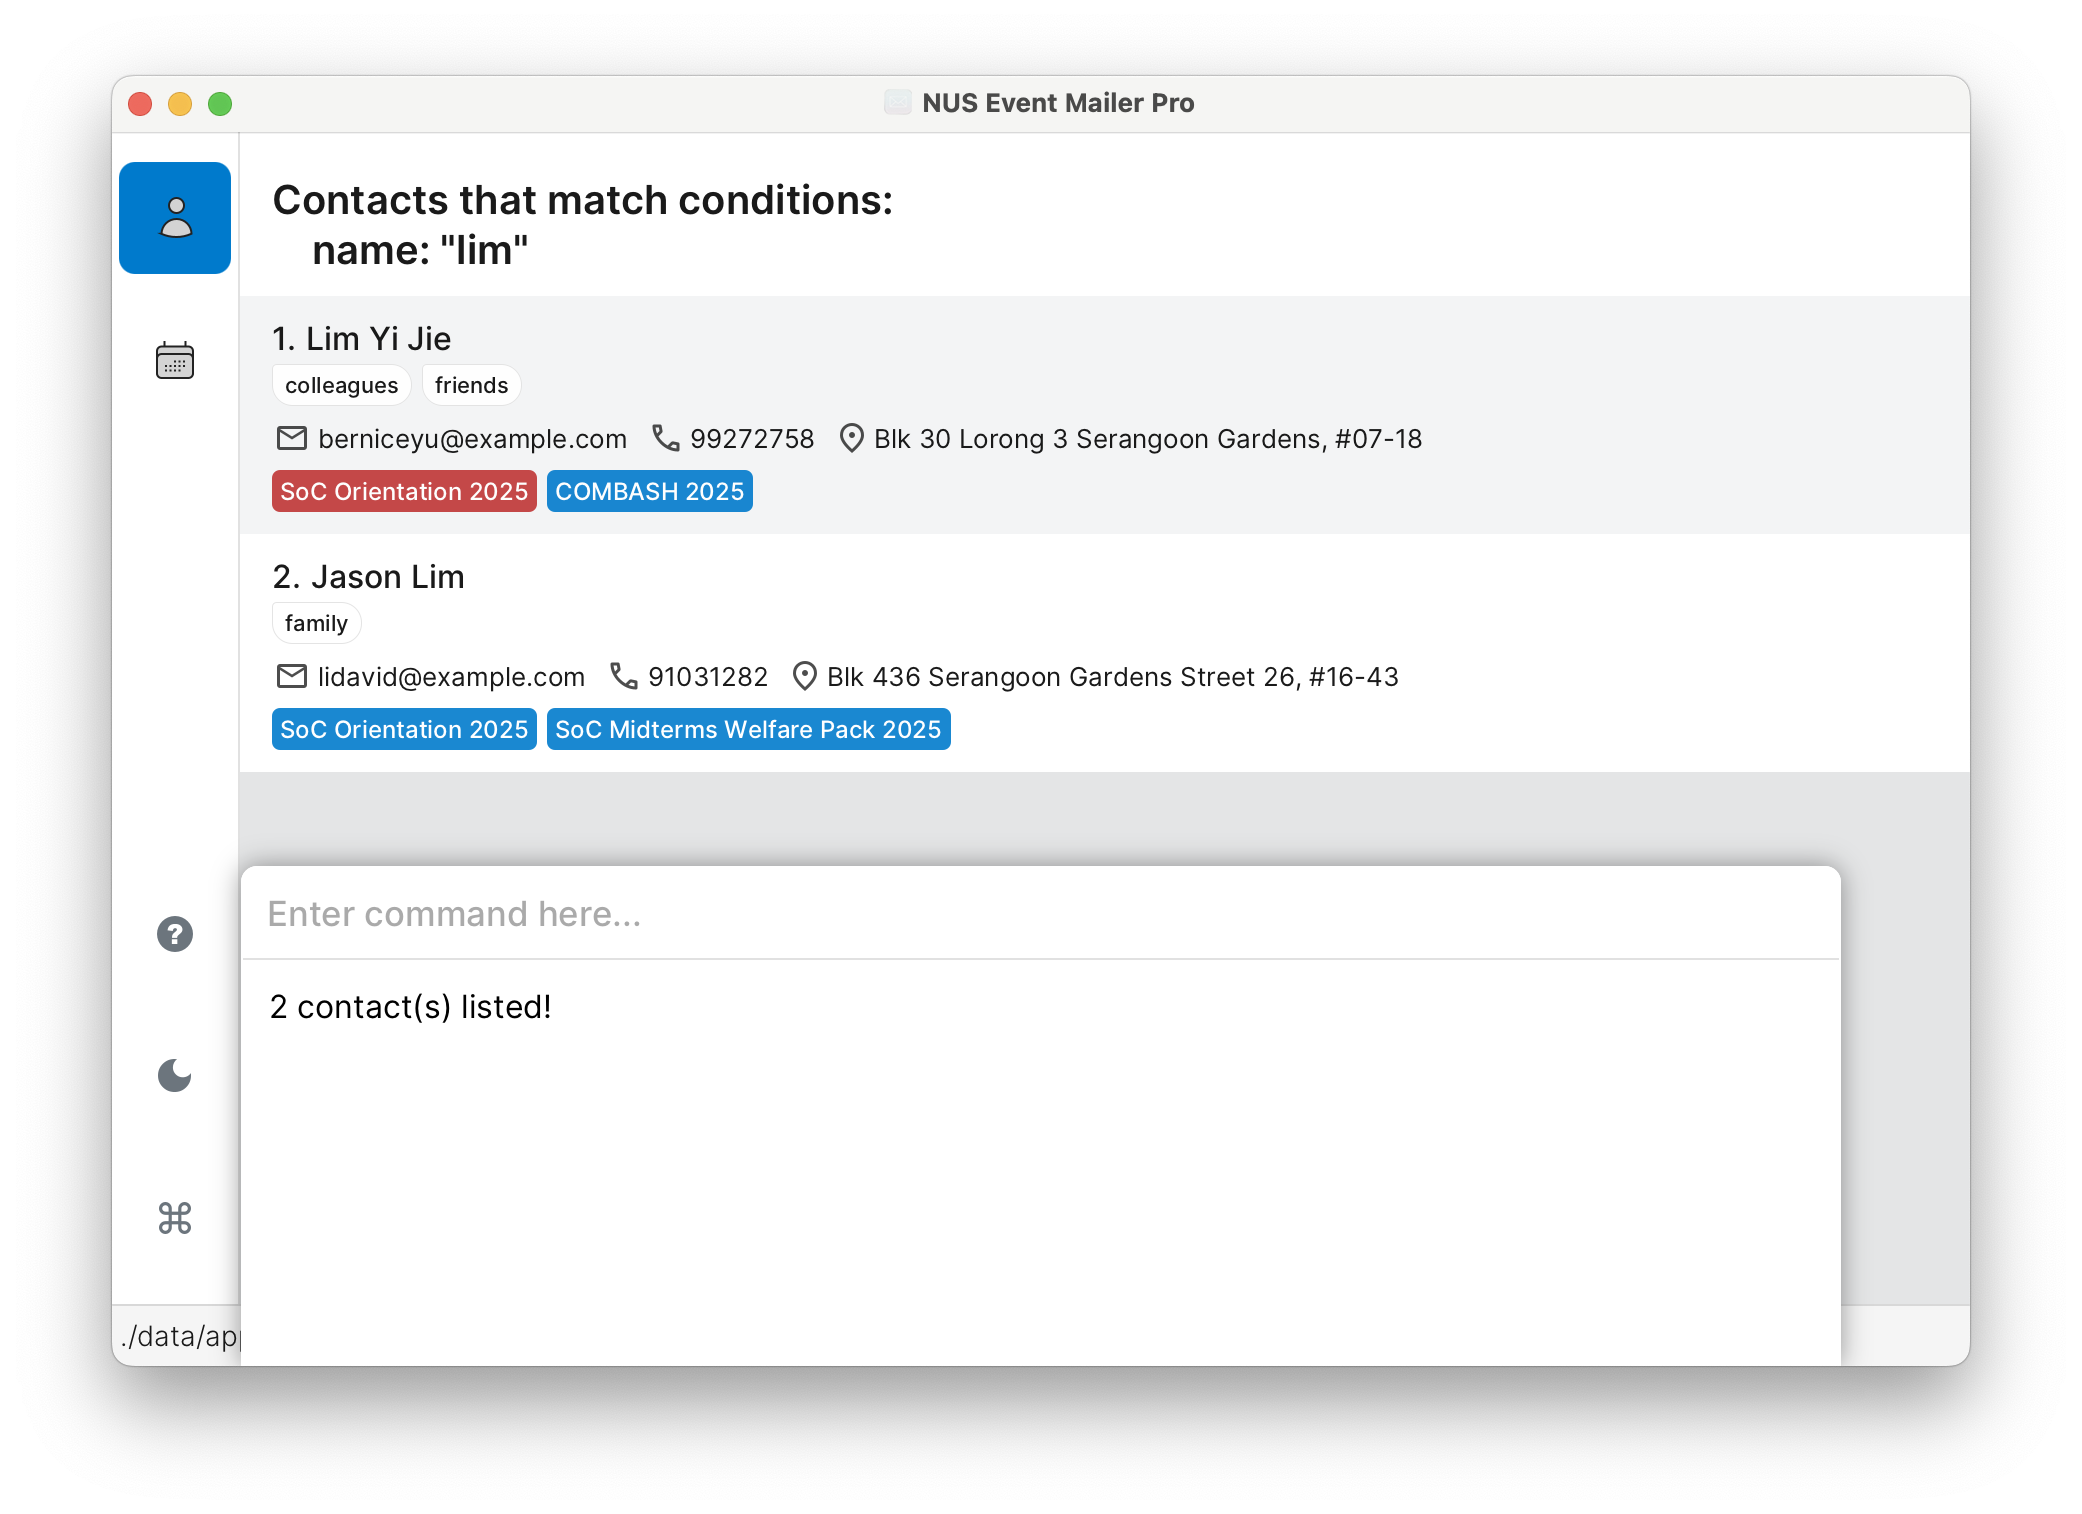
In the example screenshot, contact find --name lim was executed.
2.5 contact delete
Delete someone from your contacts:
contact delete 3
This removes contact #3.
Important: You can find the index of the contact in the currently displayed contact list. The index should be a positive number.
Be Careful!
- Double-check the index number before deleting
- This removes the contact from all linked events too
- You can't undo this, so make sure you do want to delete before continuing
Format:
contact delete INDEX
Screenshot Example:
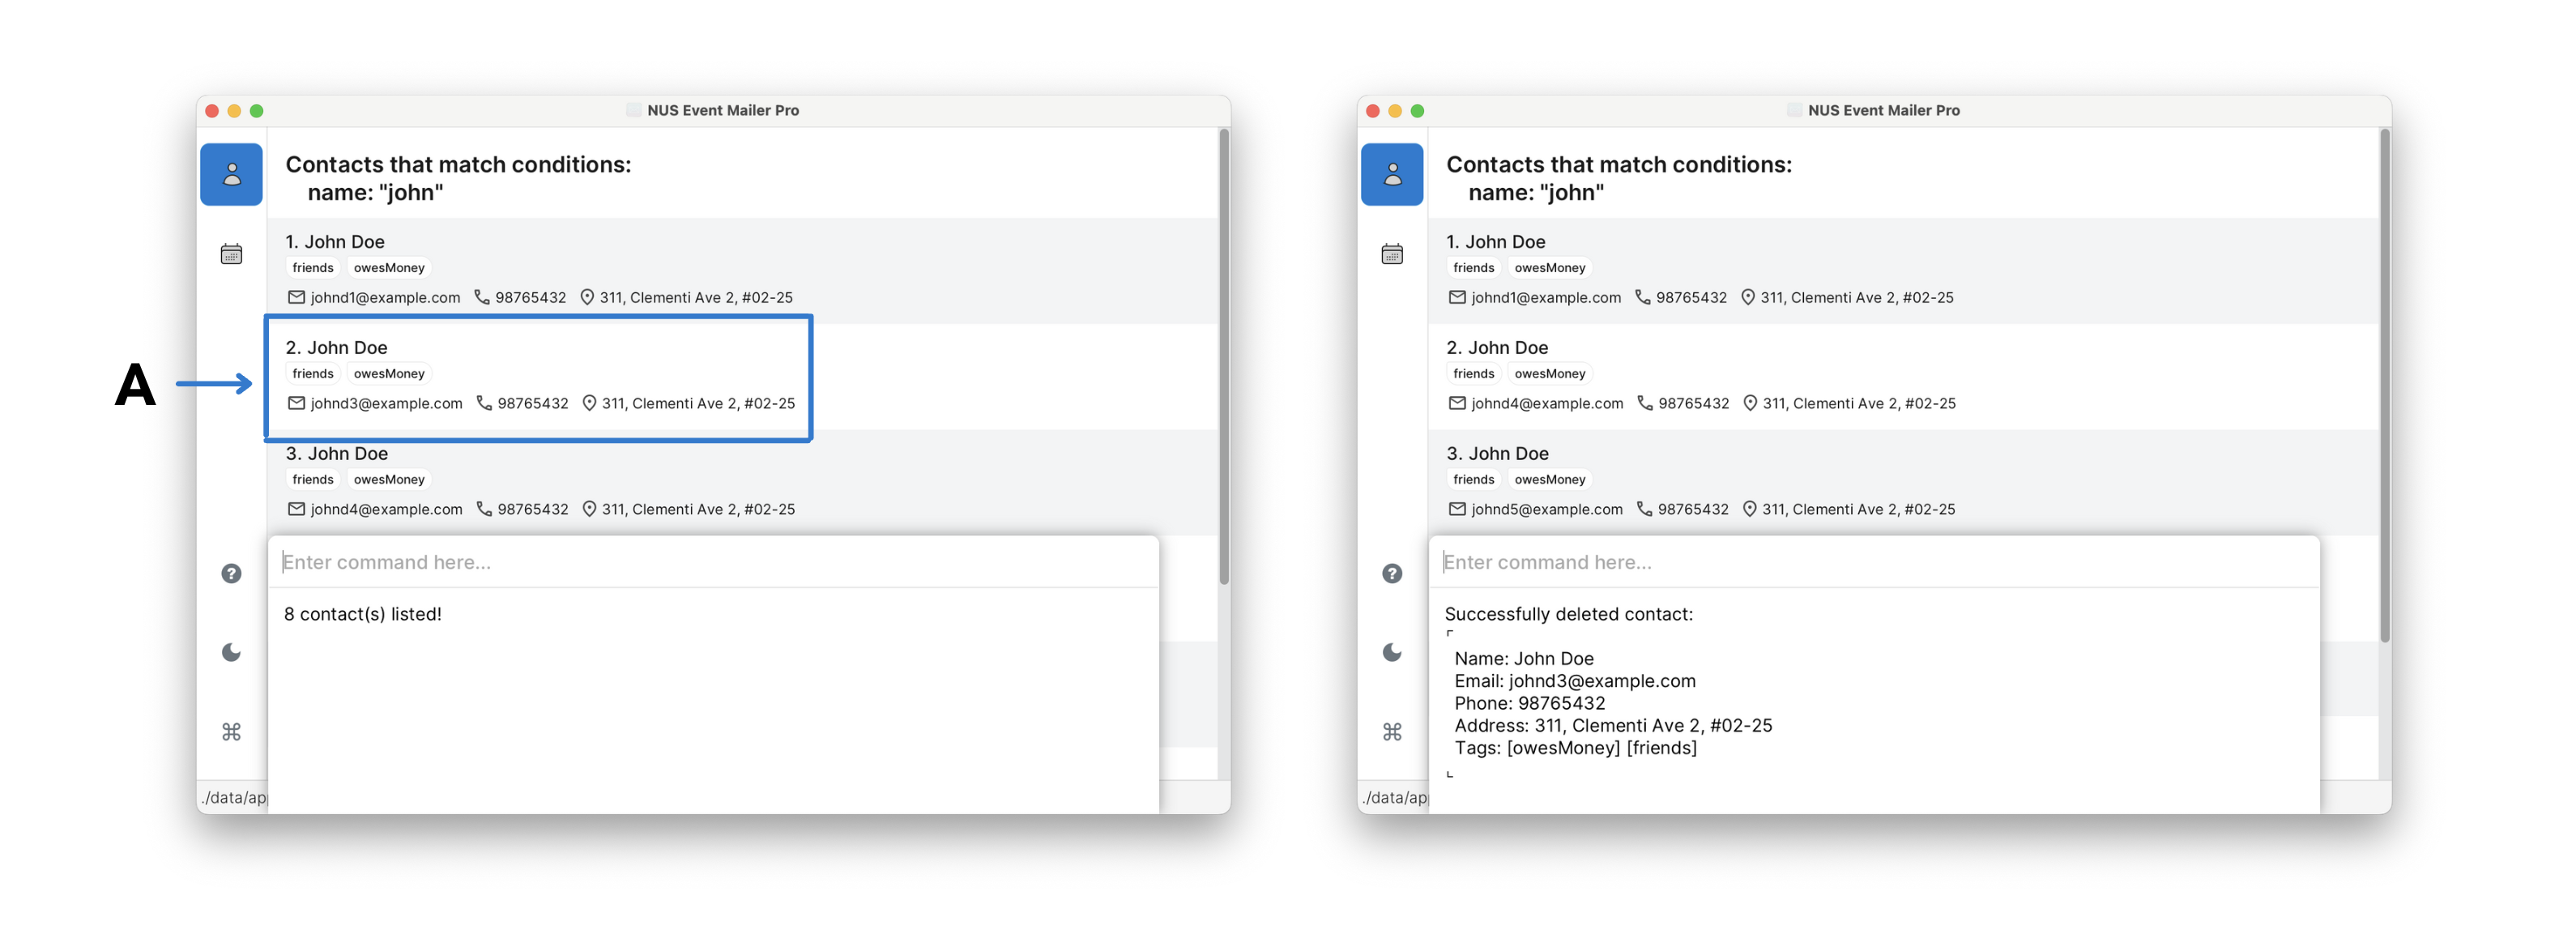 In the example screenshot,
contact find --name john was executed, and to delete the contact at index 2 (highlighted under A), contact delete 2 was executed.
2.6 contact show
Check what events someone is invited to:
contact show 2
Shows all events for contact #2.
Important: You can find the index of the contact in the currently displayed contact list. The index should be a positive number.
When This is Useful:
- Remember what you invited someone to
- Check someone's event history
- Great for following up with people!
Format:
contact show INDEX
Screenshot Example:
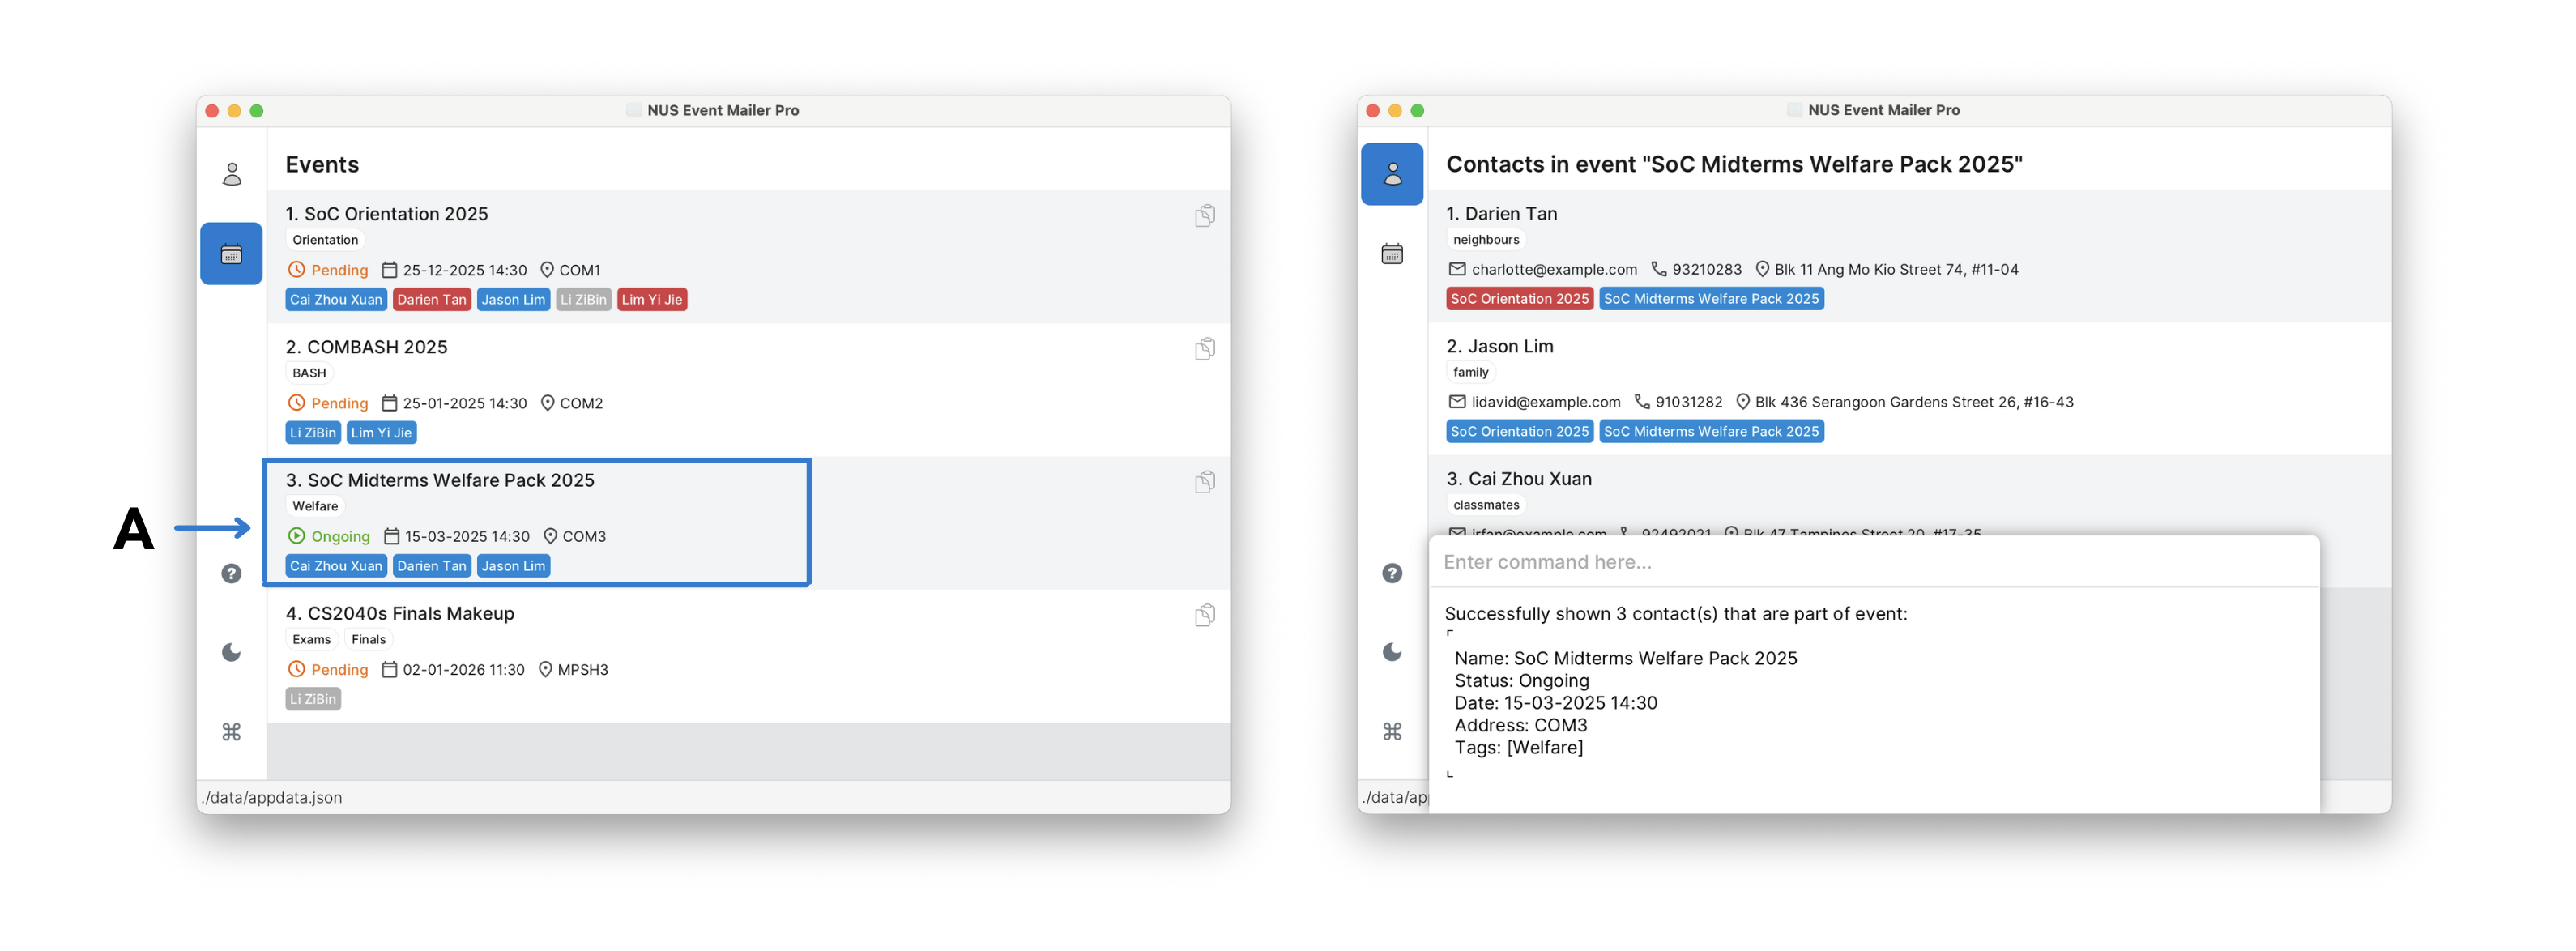 In the example screenshot, we want to show all events for the contact at index 3 (highlighted under A), so we execute
contact show 2, bringing us to the events page.
3. Managing Your Events
3.1 event add
Plans a new event and save all the details.
Basic event:
event add --name Team Meeting --date 25-12-2025 14:30
You can add a location and tags too:
event add --name Company Party --date 31-12-2025 19:00 --address Office Lounge --tag Work
Note that events are added with a default status of PENDING, you can change them later using event edit.
Event Tips:
- Date format: DD-MM-YYYY HH:MM (24-hour time)
- Address is optional but helpful for location
- Tags work similarly to contact tags
- Event names must be unique - no two events can have the same name
- For repeating events, you can include a date in the name (e.g., "Orientation 25/26" instead of just "Orientation")
Format:
event add --name NAME --date DATE [--address ADDRESS] [--tag TAG]…
Screenshot Example:
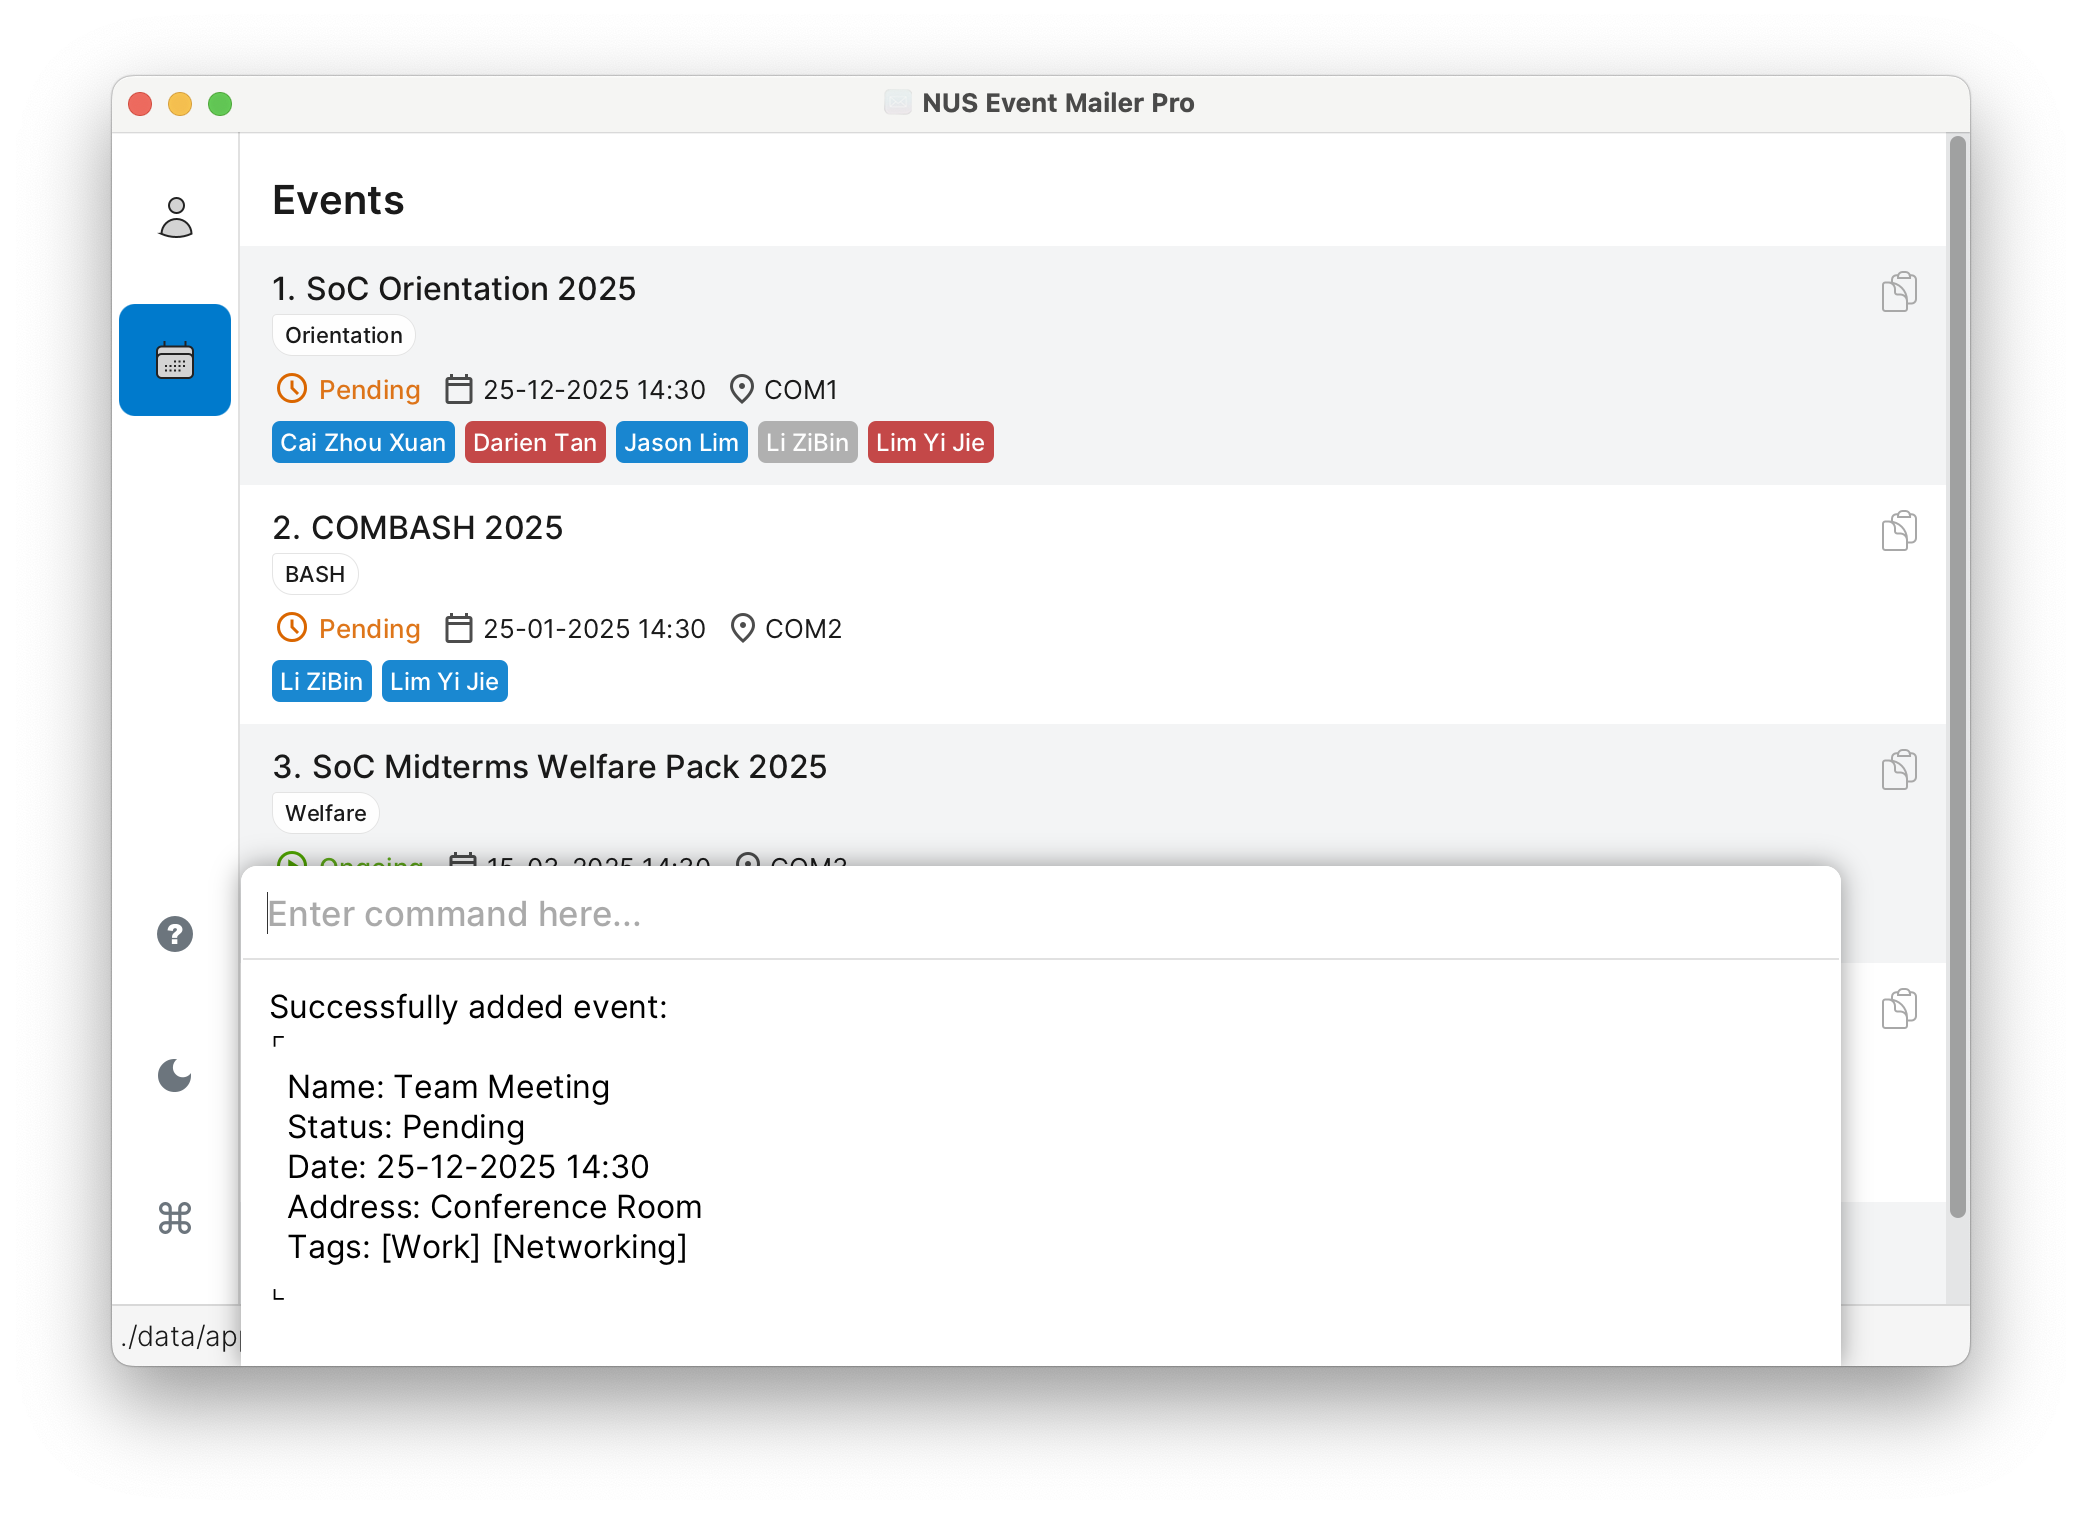
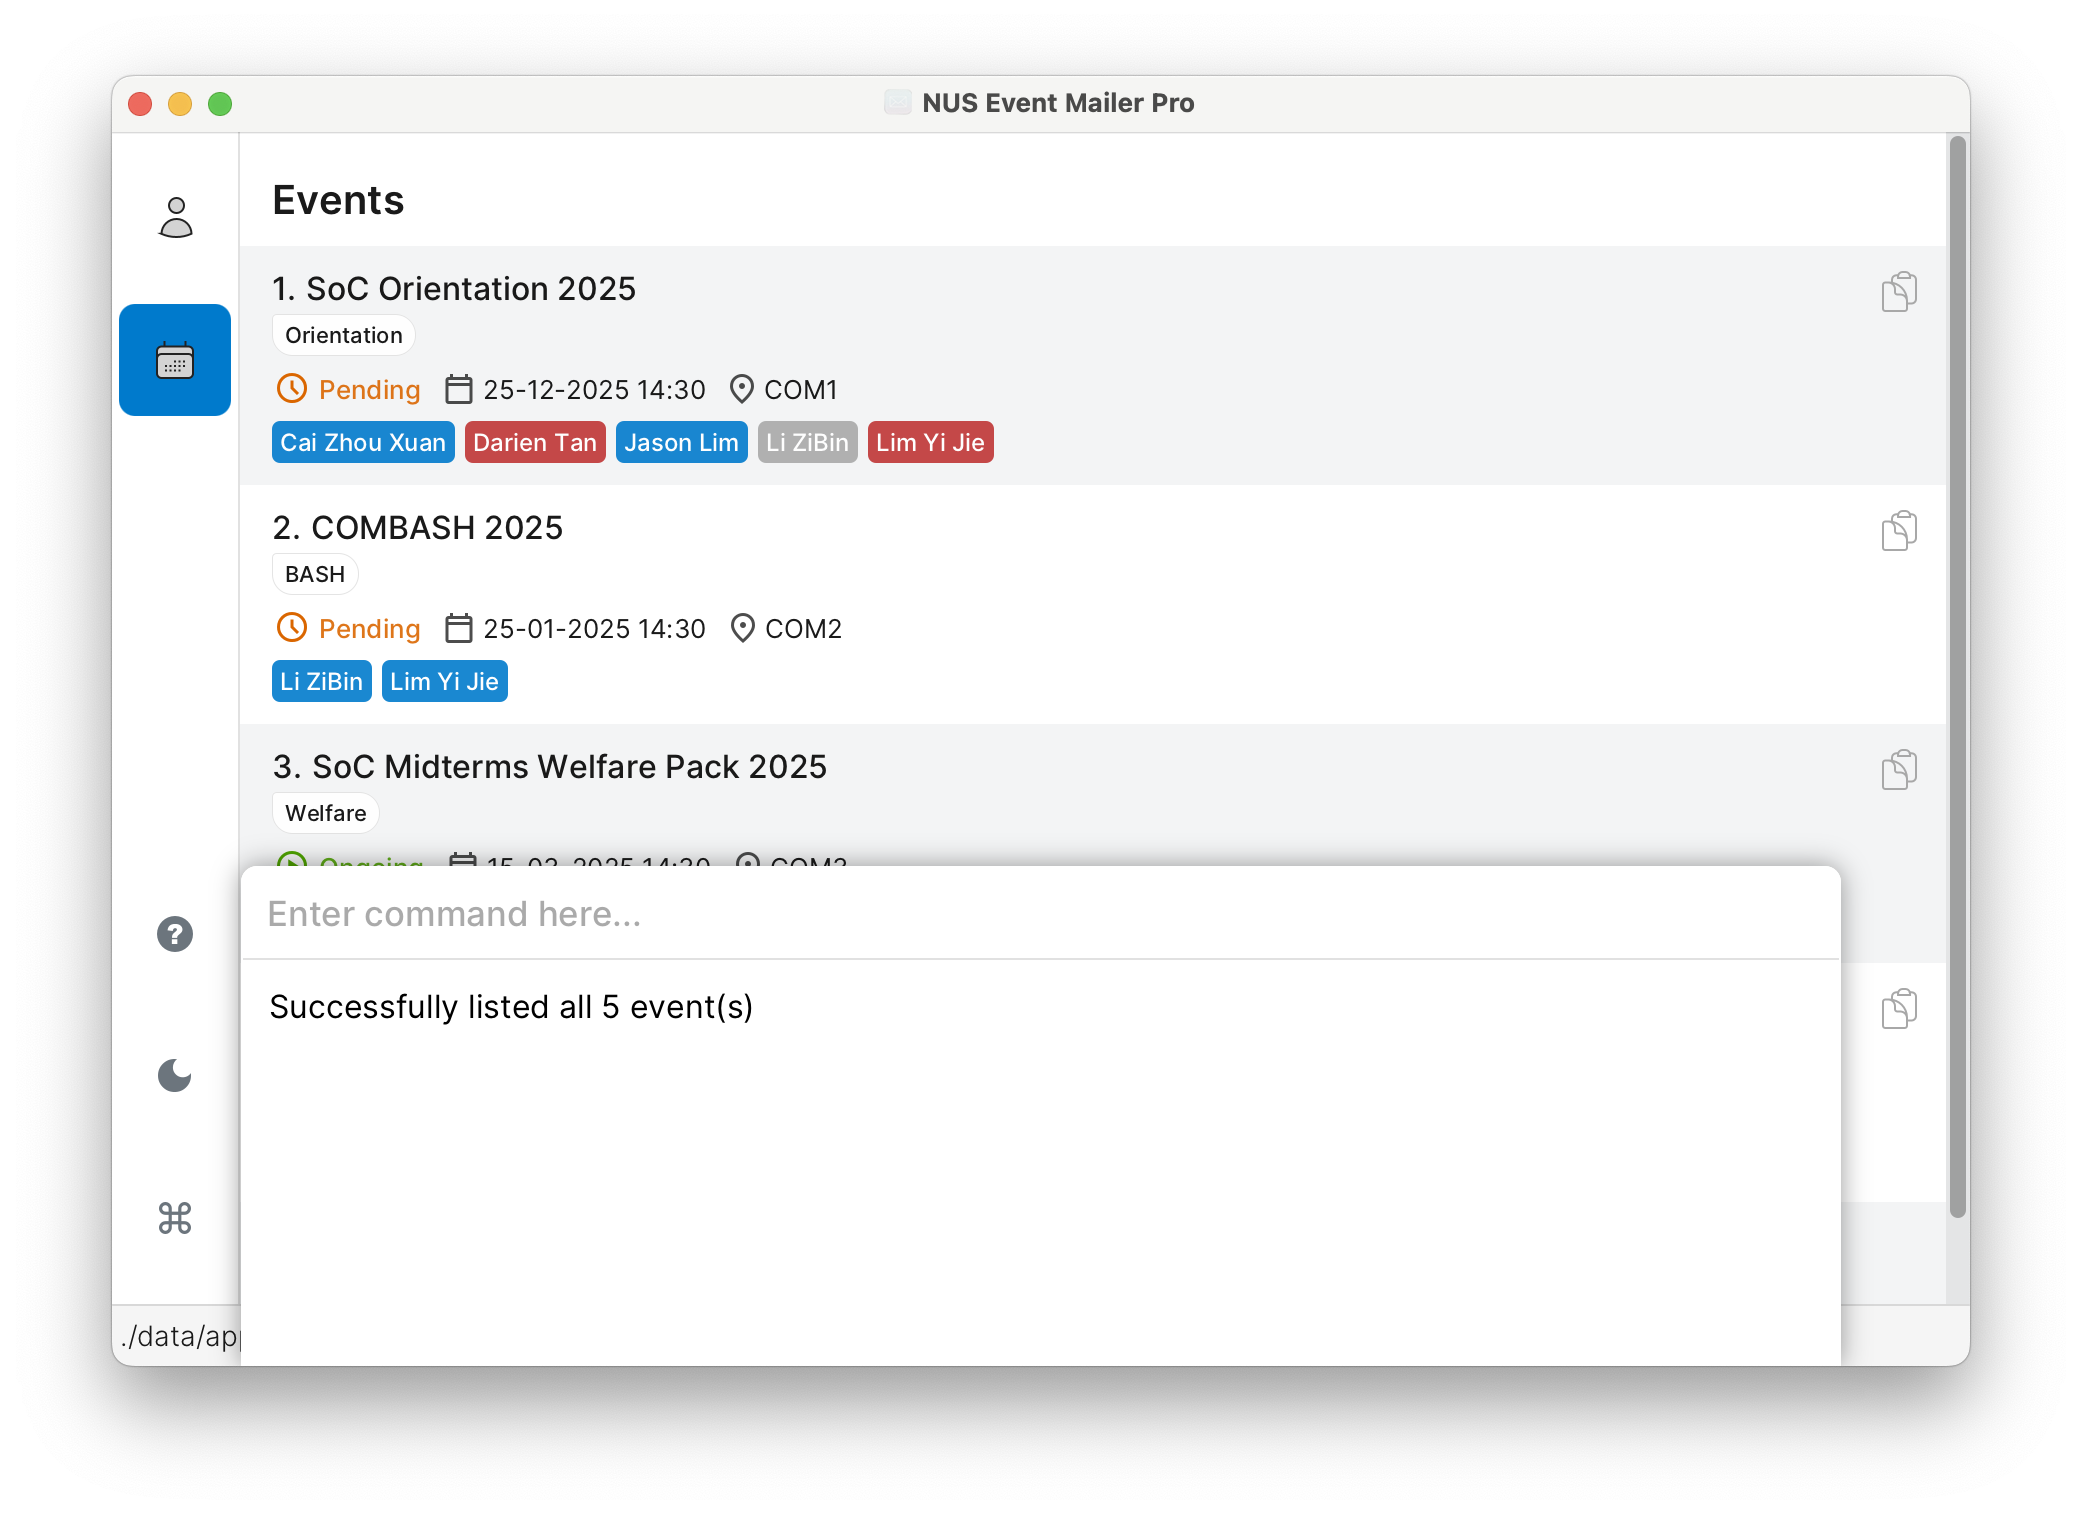
3.2 event list
See all your planned events.
event list
👀 What You'll See:
- Events with their status, date, time, and location (if present)
- Each event has an index number, similar to how contacts work
- Events are listed in the order you added them, not by date
Screenshot Example:
3.3 event edit
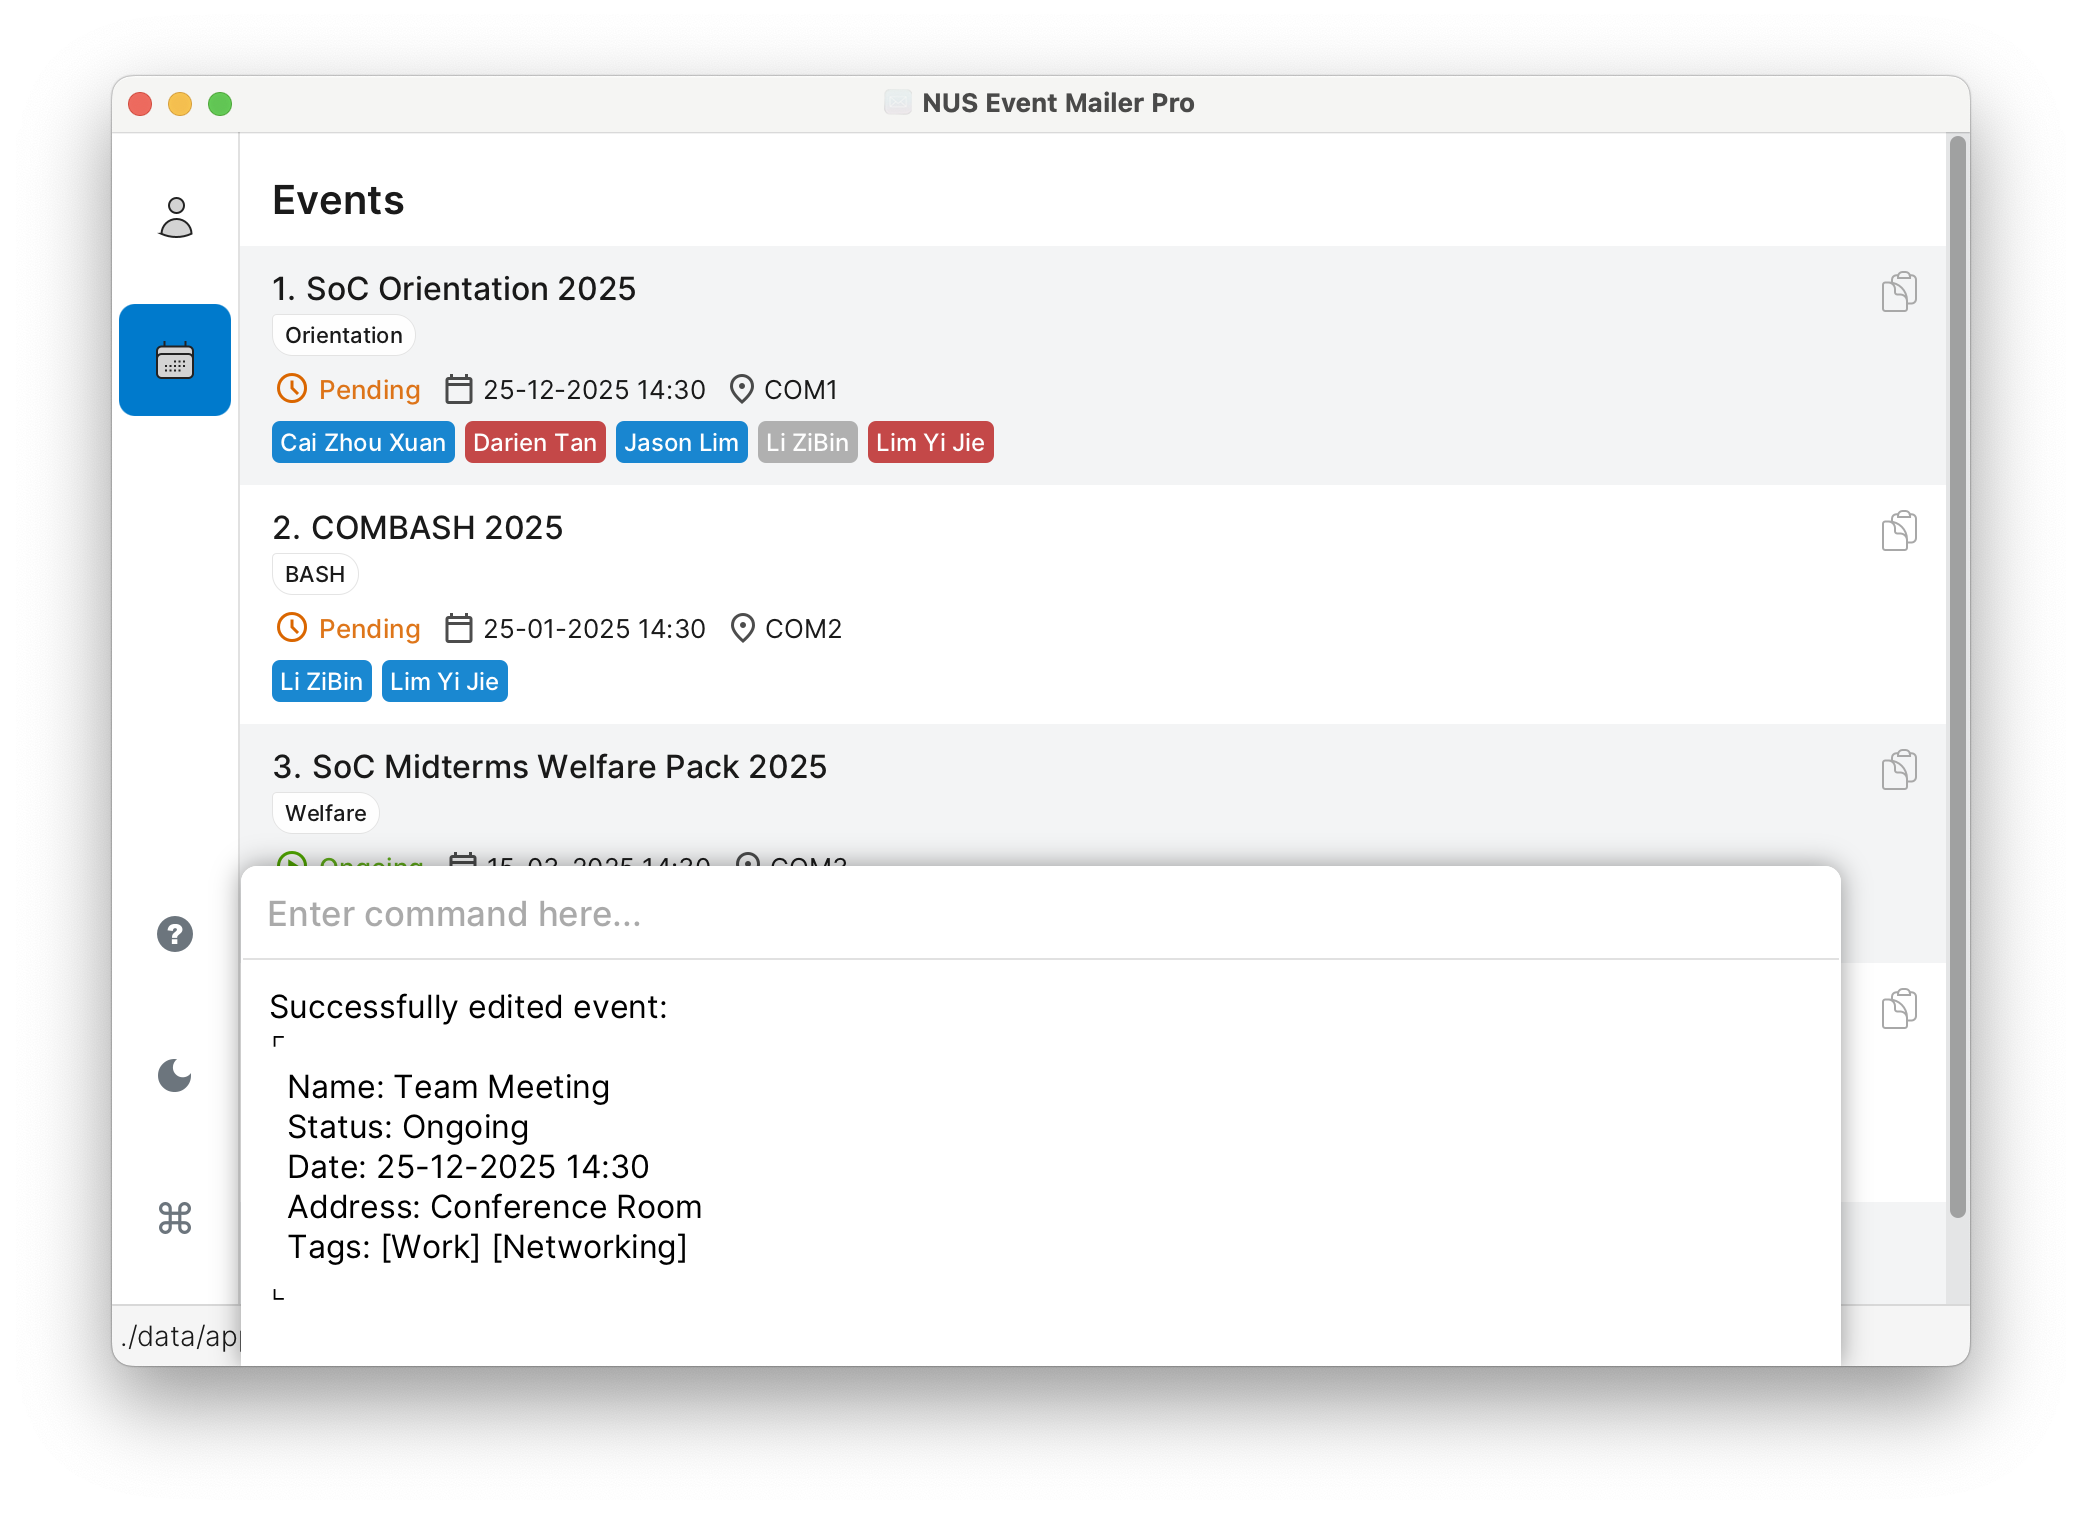
Update event information when plans change.
How to do it:
event edit 1 --name New Meeting Name --date 26-12-2025 15:00
This changes event #1's name and time.
Important: You can find the index of the event in the currently displayed event list. The index should be a positive integer.
What You Can Change:
- Event name (must remain unique across all events)
- Date and time
- Location/address
- Event status
- PENDING - Event is planned/announced (default)
- ONGOING - Event is currently in progress
- DONE - Event has ended
- Tags (this will override the original tags!)
- You must change at least one thing
Format:
event edit INDEX [--name NAME] [--date DATE] [--address ADDRESS] [--status STATUS] [--tag TAG]…
Screenshot Example:
3.4 event find
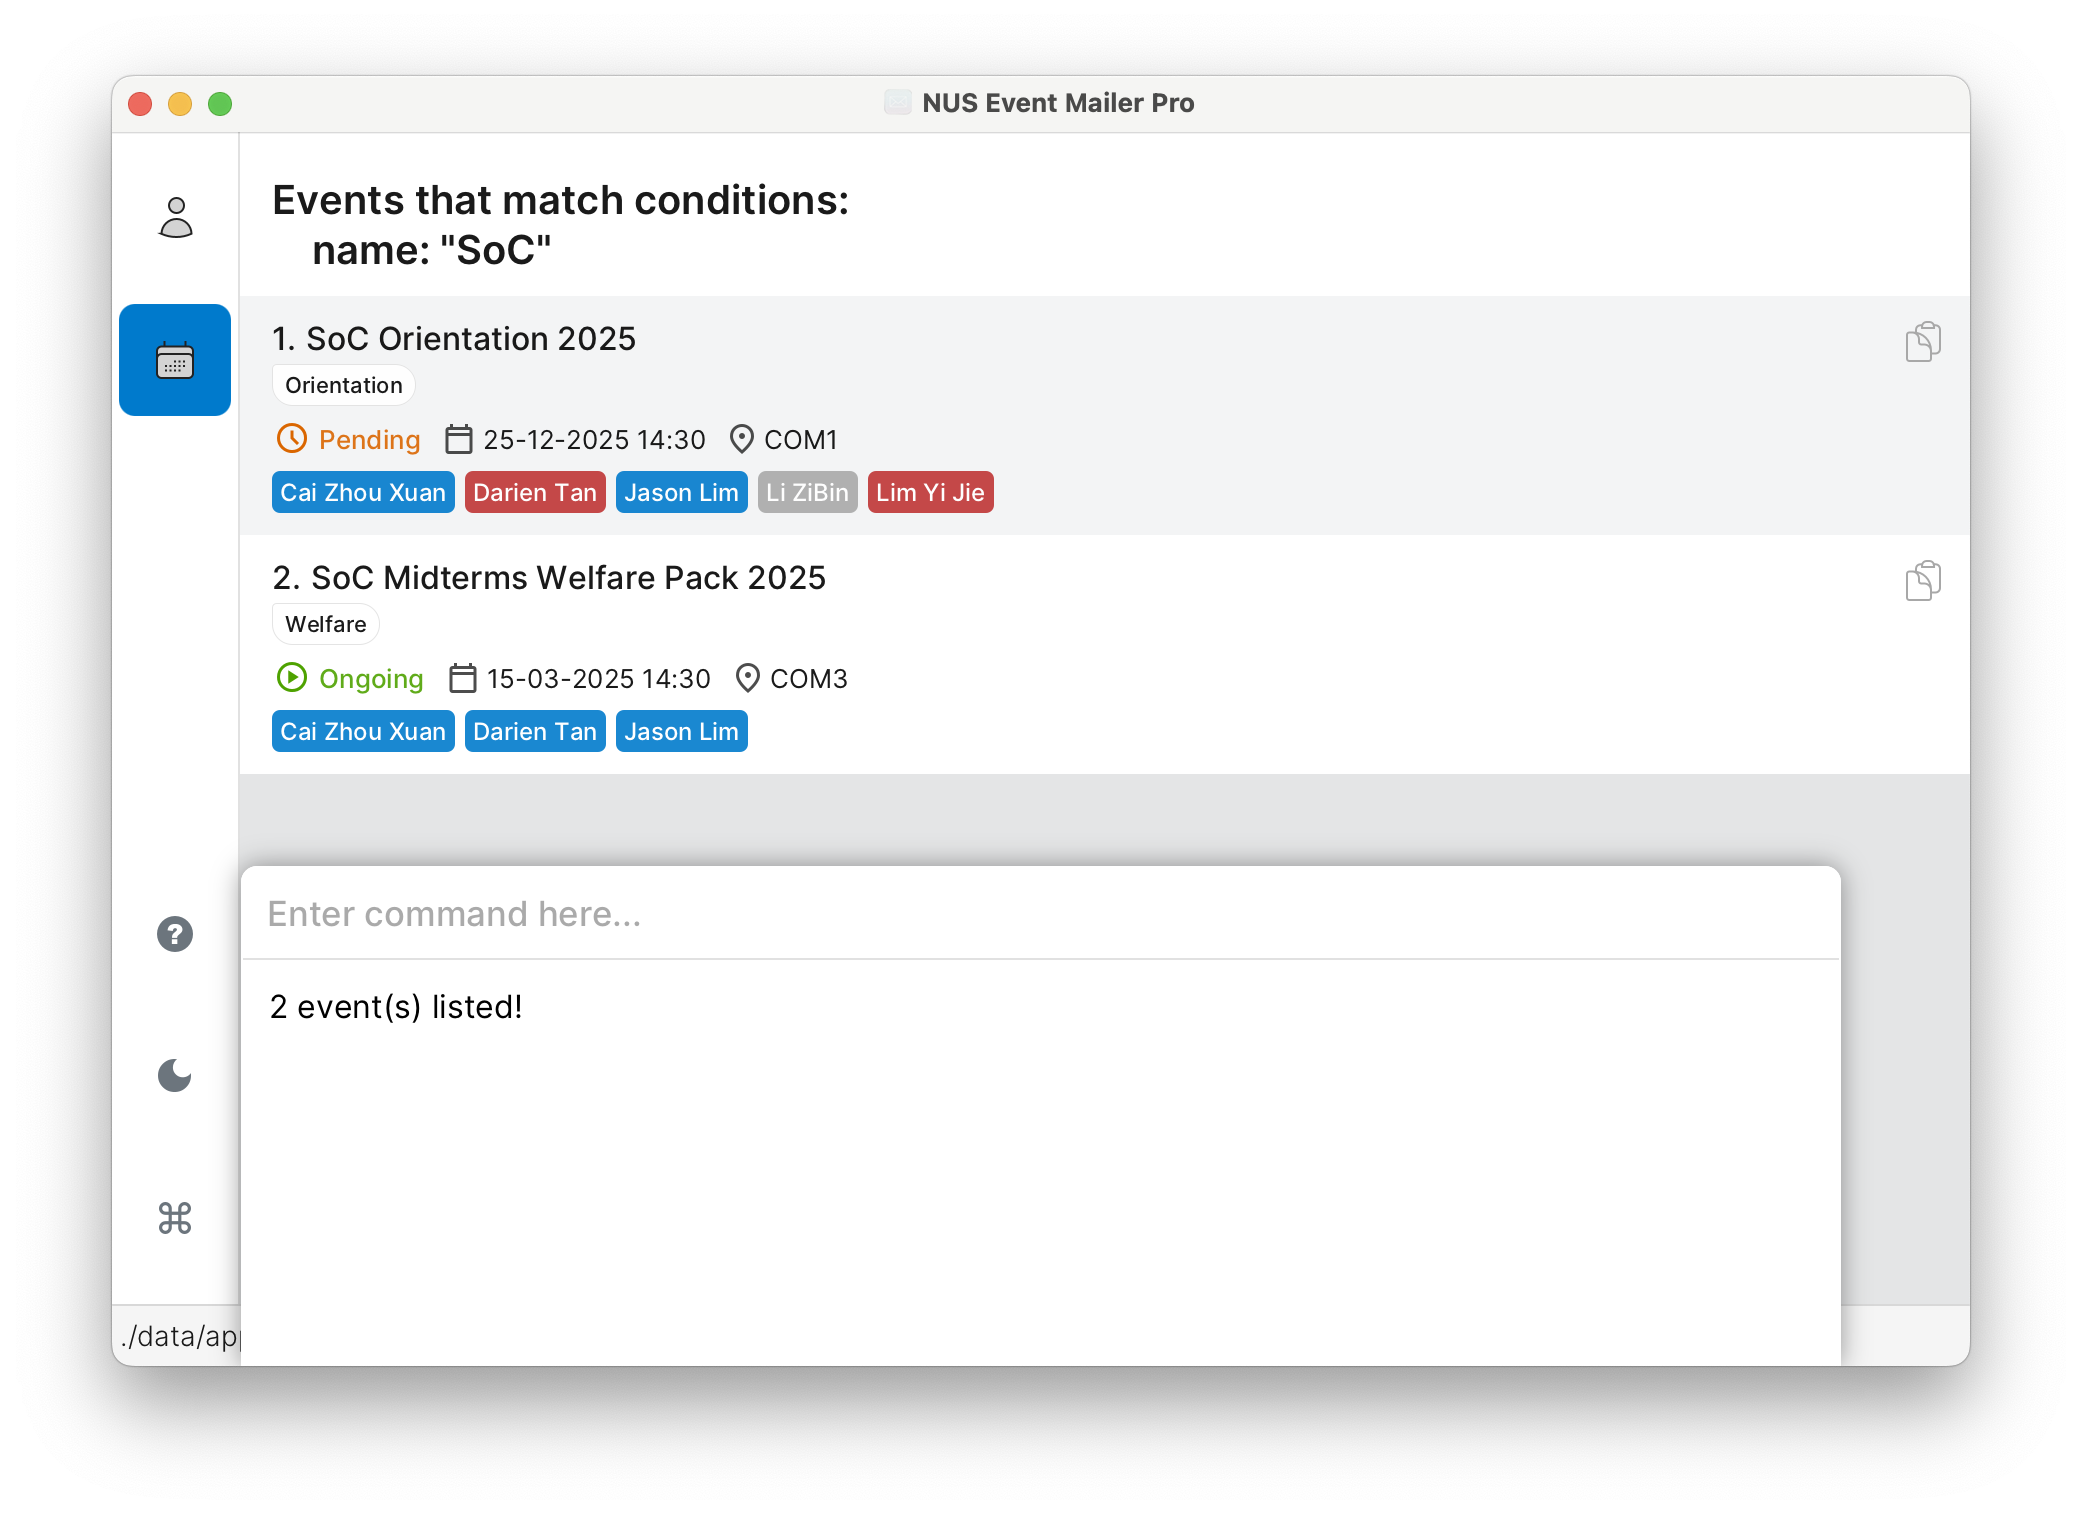
Looking for a specific event? You can search in different ways:
Simple name search:
event find Meeting
Search by specific information:
event find --name Conference
event find --status pending
event find --date 25-12-2025 12:00
event find --address serangoon
event find --tag work
Combine searches:
event find --name meeting conference --tag work important
Event find works the same way as contact find (see How Search Works for details).
- Date searches look for exact matches (e.g.
25-12-2025 12:00finds only that date and time) - Only one date can be specified
- Status searches look for one of:
pending,ongoing,done
Note: Similar to contact find, after using event find, same events will likely have different index numbers when compared to using event list. Remember to use these displayed index numbers instead when running commands on the found events.
Format:
event find KEYWORD [MORE_KEYWORDS]… or event find [--FIELD KEYWORD [MORE_KEYWORDS]…]…
Screenshot Example:
3.5 event delete
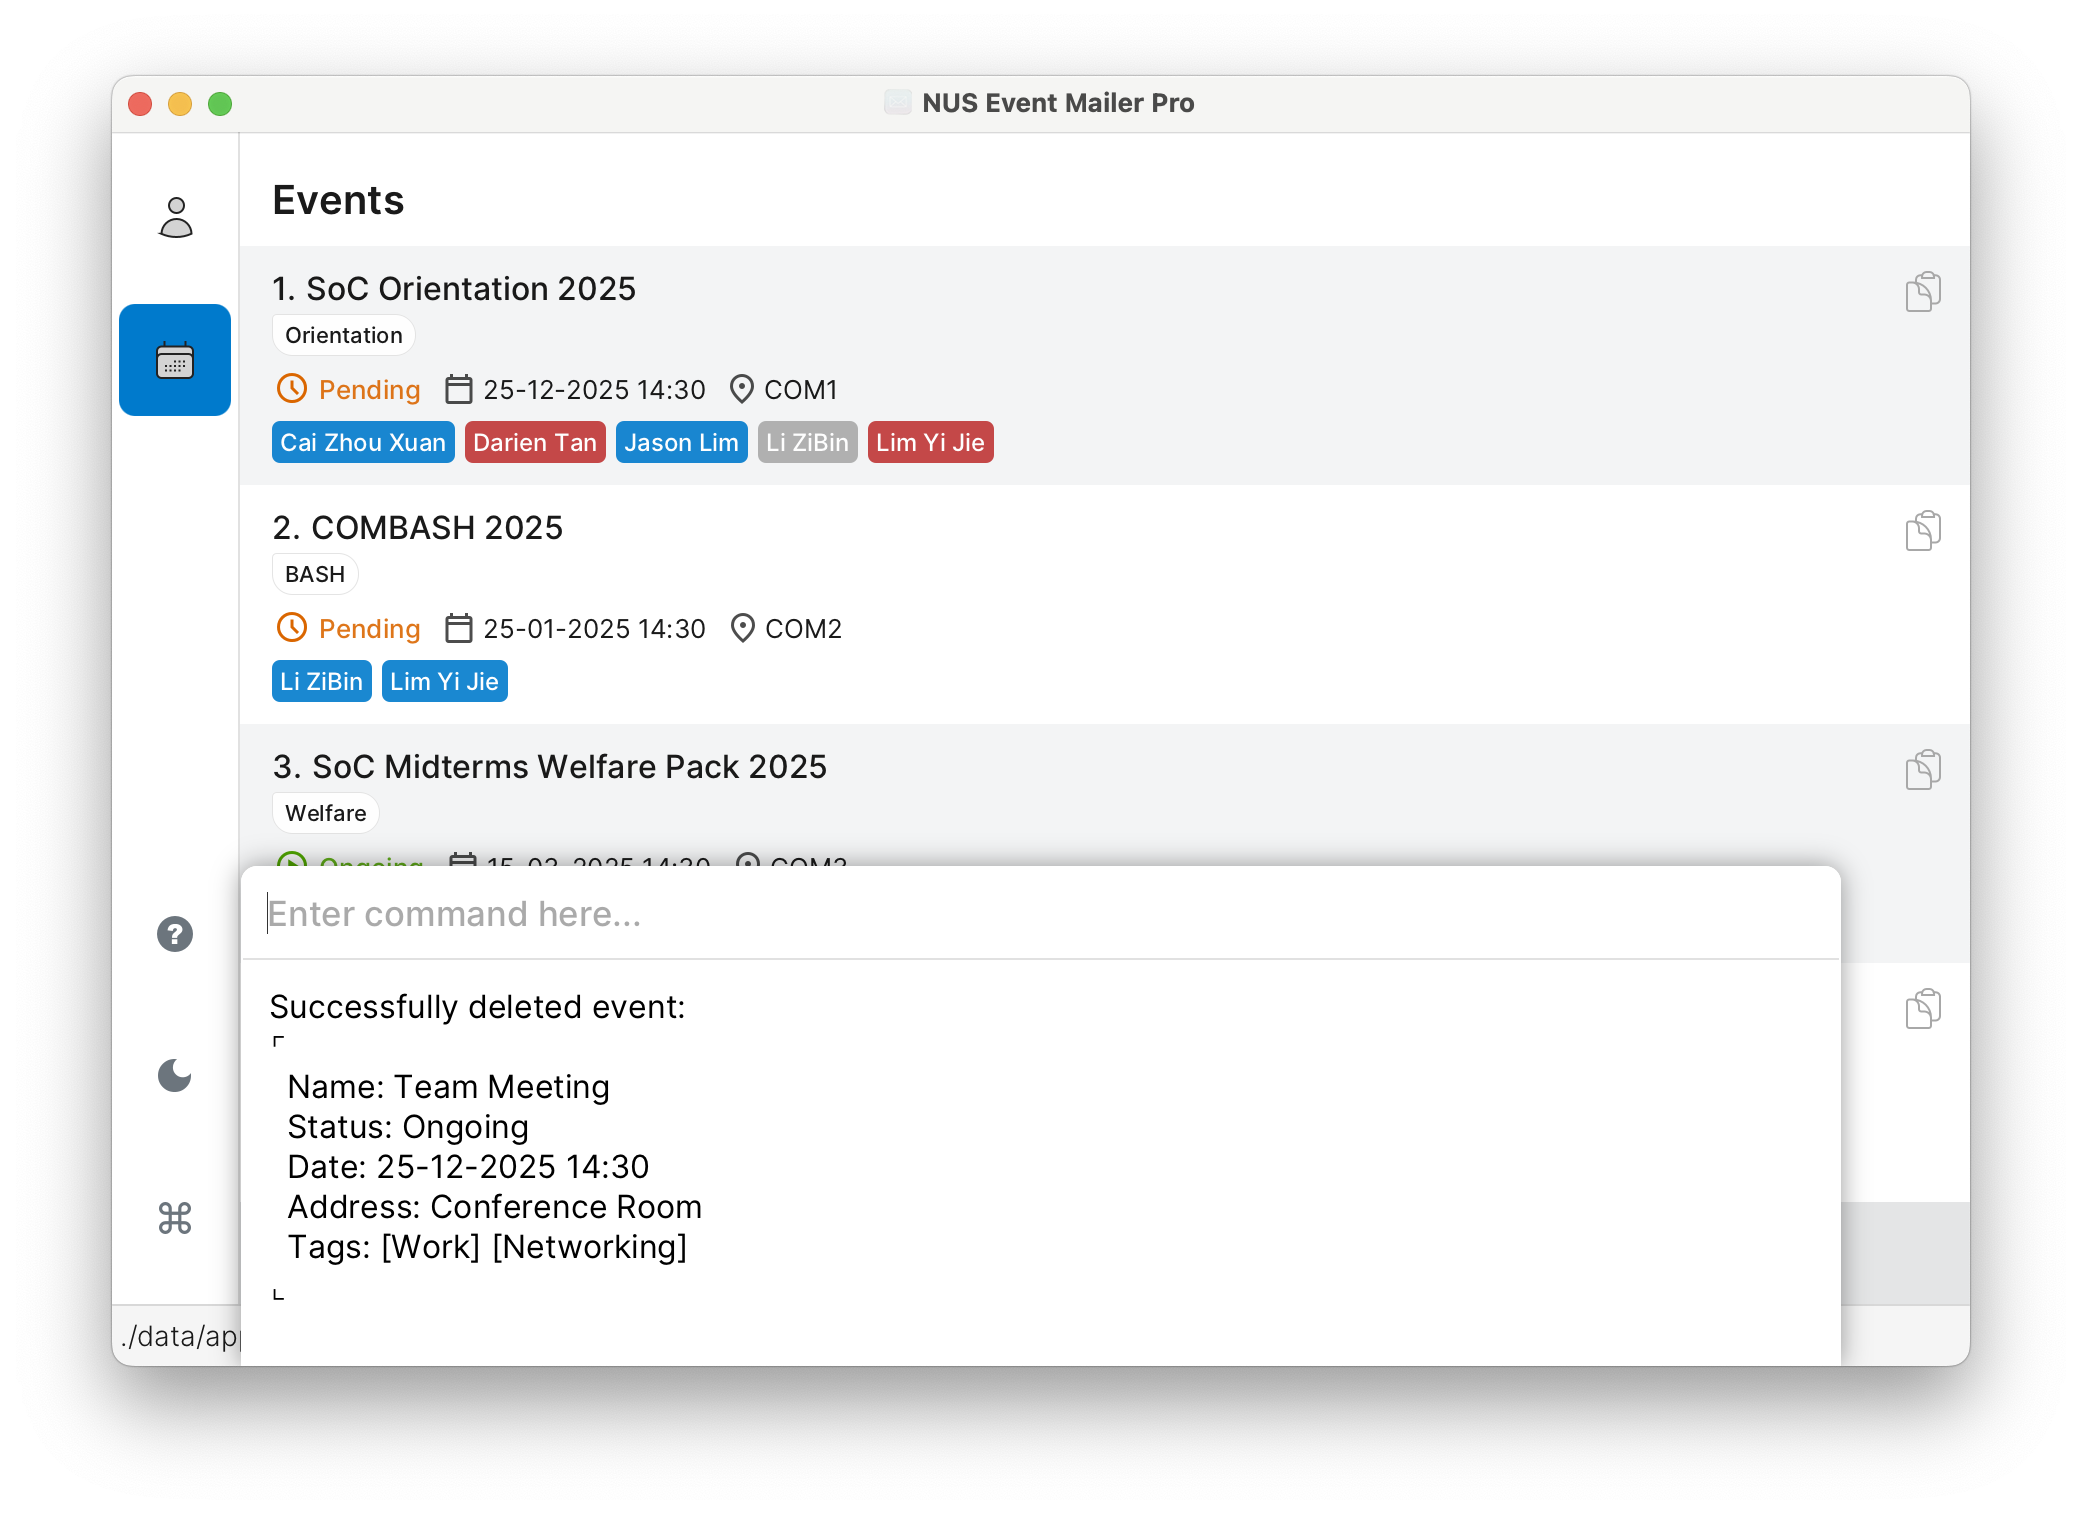
Remove an event completely:
event delete 2
This deletes event #2 and removes all contact connections.
Important: You can find the index of the event in the displayed event list. The index should be a positive number.
Think Before You Delete!
- This can't be undone!
- All linked contacts will be unlinked from this event
- Consider using
event unlinkto remove specific people if you want to keep the event
- Consider using
- Double-check the event number before deleting
Format:
event delete INDEX
Screenshot Example:
3.6 event link
Add contacts to your event guest list:
event link --event 1 --contact 2
This adds contact #2 to event #1.
You can also quickly invite everyone in your currently displayed contact list to an event:
event link --event 1 --contact listed
This adds all contacts from your currently displayed contact list to event #1.
Important:
- You can find the event index in the displayed event list
- You can find the contact index in the displayed contact list
- Both indexes should be a positive number, unless you use
listedforCONTACT_INDEX - Using
--contact listedwill link every contact displayed in the contact list to the specified event
Inviting Tips:
- First check event list and contact list for the right numbers
- One person can be in multiple events
- You can add the same contact to many events
- You can use
contact findorevent showto change the currently displayed contact list, and combine it with using--contact listedfor powerful bulk invites!
Format:
event link --event EVENT_INDEX --contact CONTACT_INDEX
Screenshot Example:
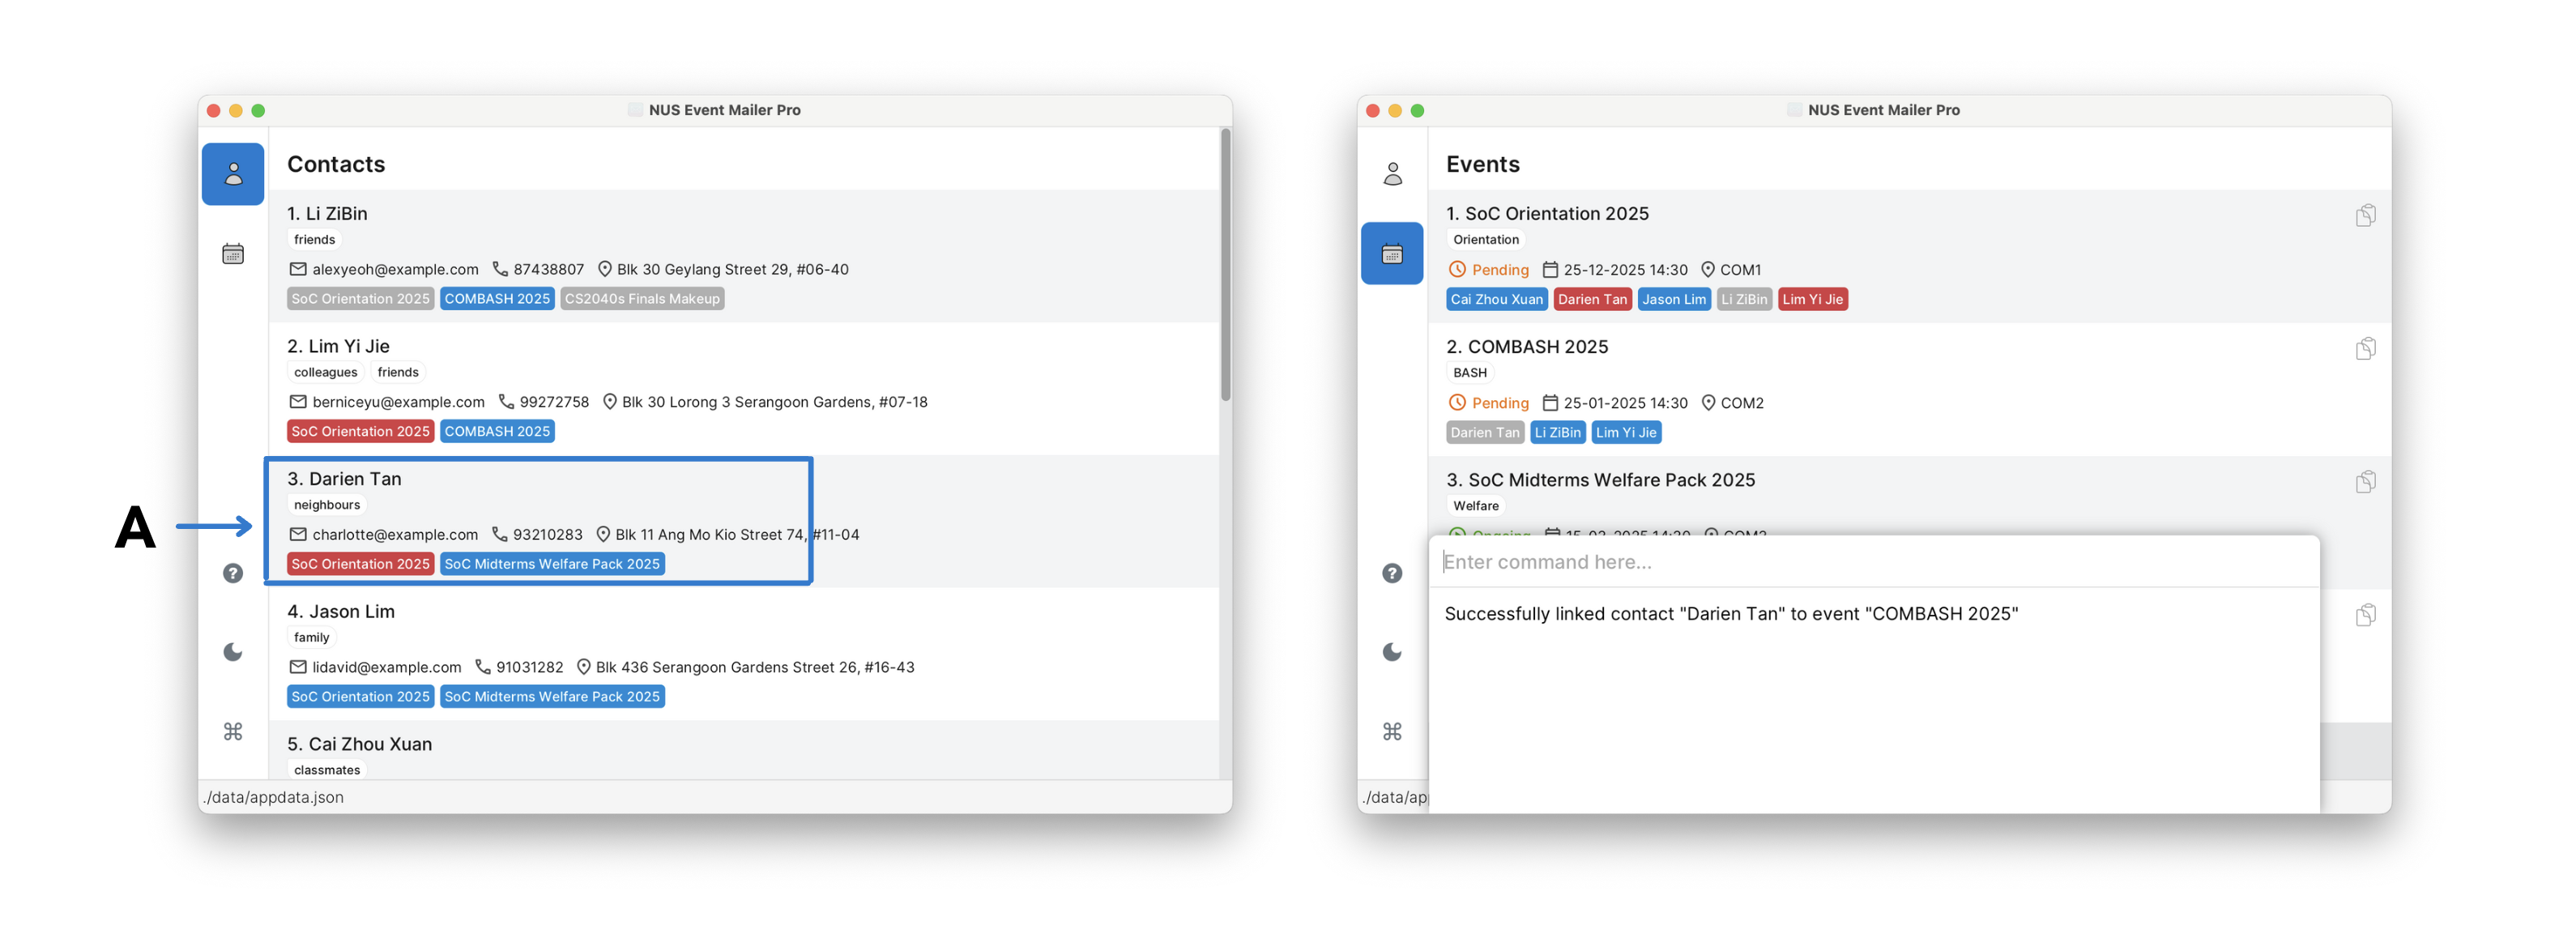 In the example screenshot, we want to link the contact at index 3 (highlighted under A) to the event at index 2, so we execute
event link --event 2 --contact 3.
3.7 event unlink
Take someone off an event when they can't make it:
event unlink --event 1 --contact 2
Removes contact #2 from event #1.
You can also quickly clear your guest list for an event:
event unlink --event 1 --contact listed
This removes all contacts from your currently displayed contact list — perfect for resetting or rebuilding your guest list.
Important:
- You can find the event index in the displayed event list
- You can find the contact index in the displayed contact list
- Both indexes should be a positive number, unless you use
listedforCONTACT_INDEX - Using
--contact listedwill unlink every contact displayed in the contact list from the specified event
When to Use This:
- Someone can't make it anymore
- The contact stays in your main contact list
- Only removes them from this specific event
- Great for managing last-minute changes!
Format:
event unlink --event EVENT_INDEX --contact CONTACT_INDEX
Screenshot Example:
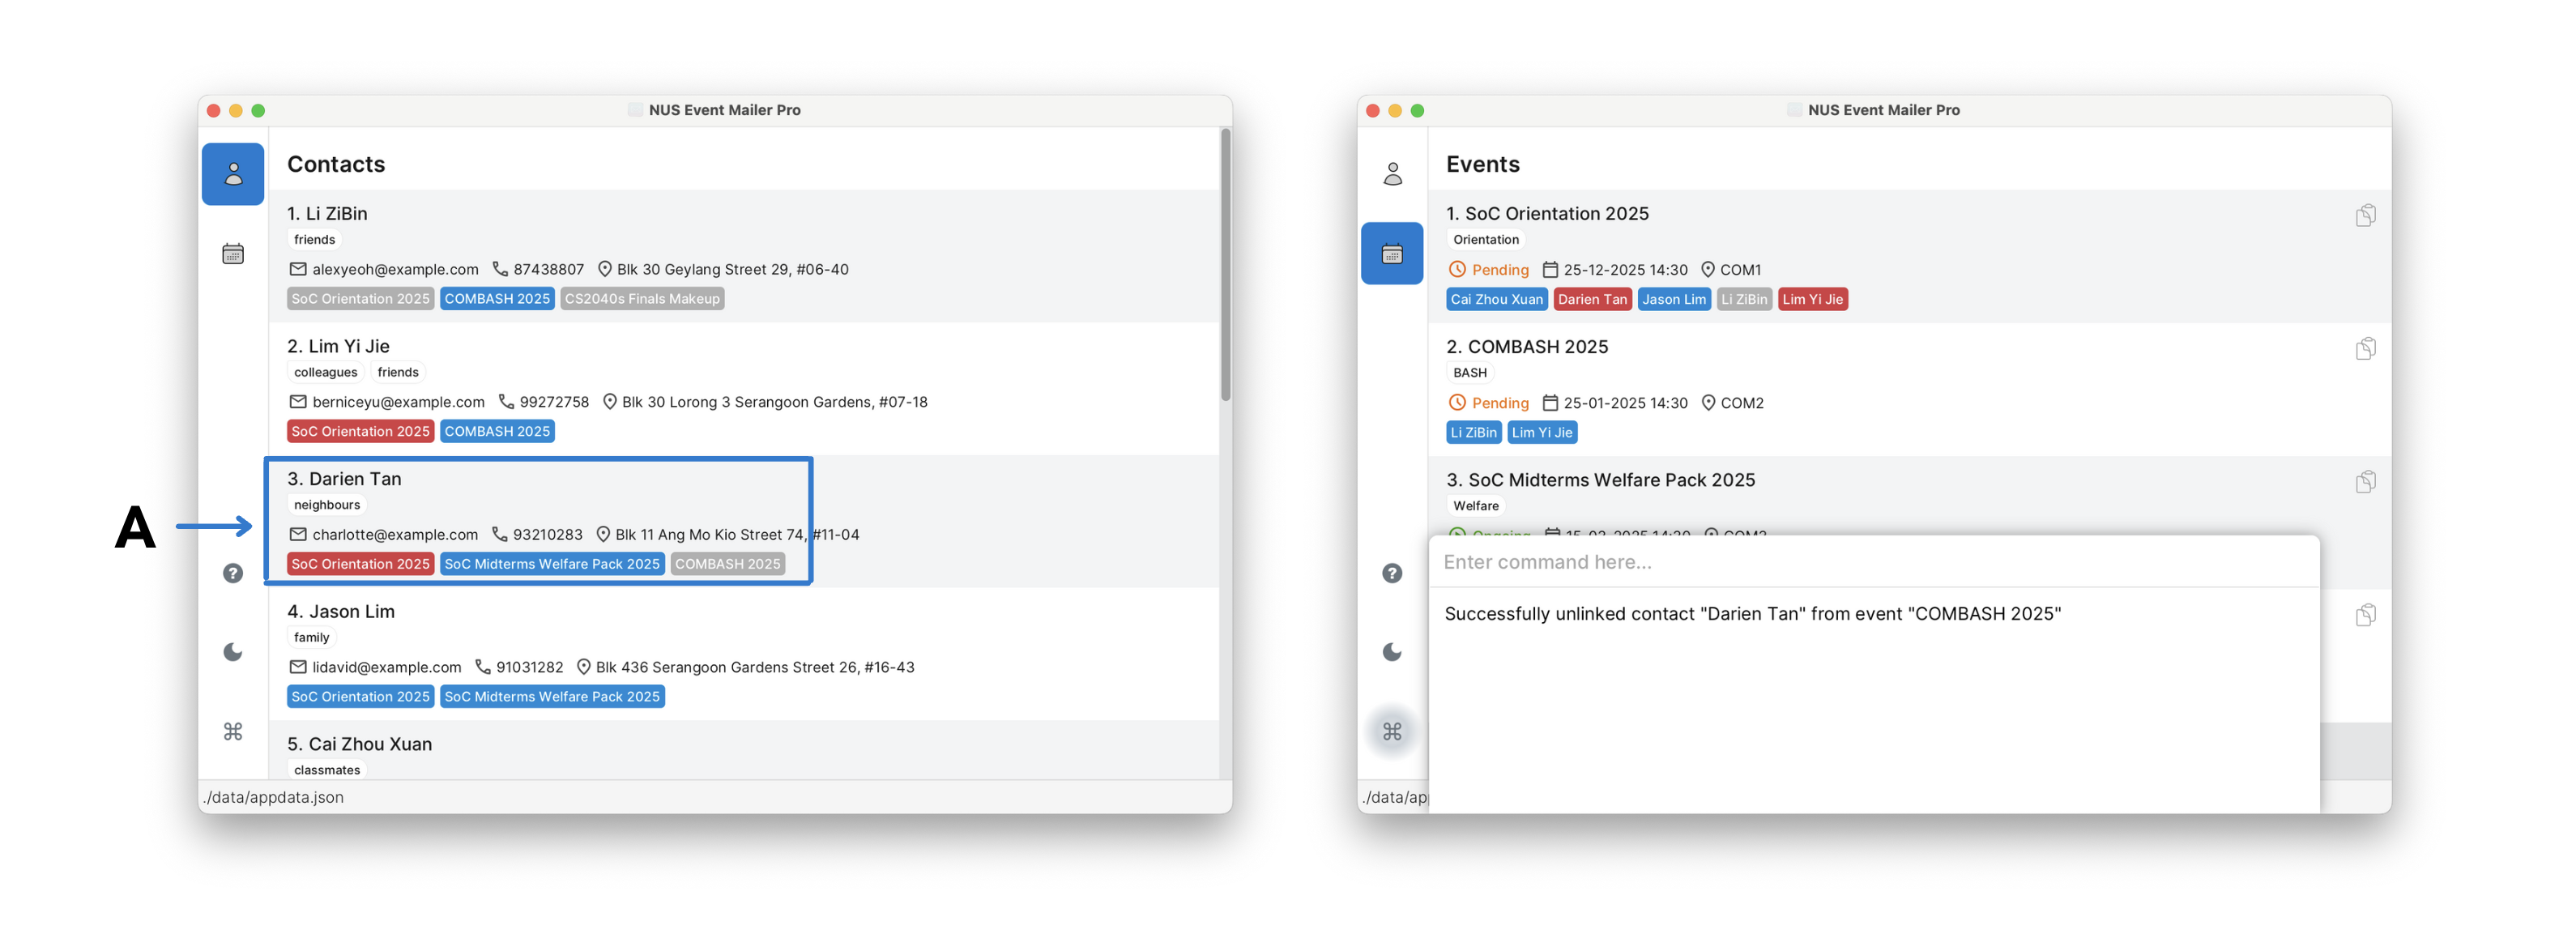 In the example screenshot, we want to unlink the contact at index 3 (highlighted under A) to the event at index 2, so we execute
event unlink --event 2 --contact 3.
3.8 event rsvp
Keep track of RSVP responses as people reply:
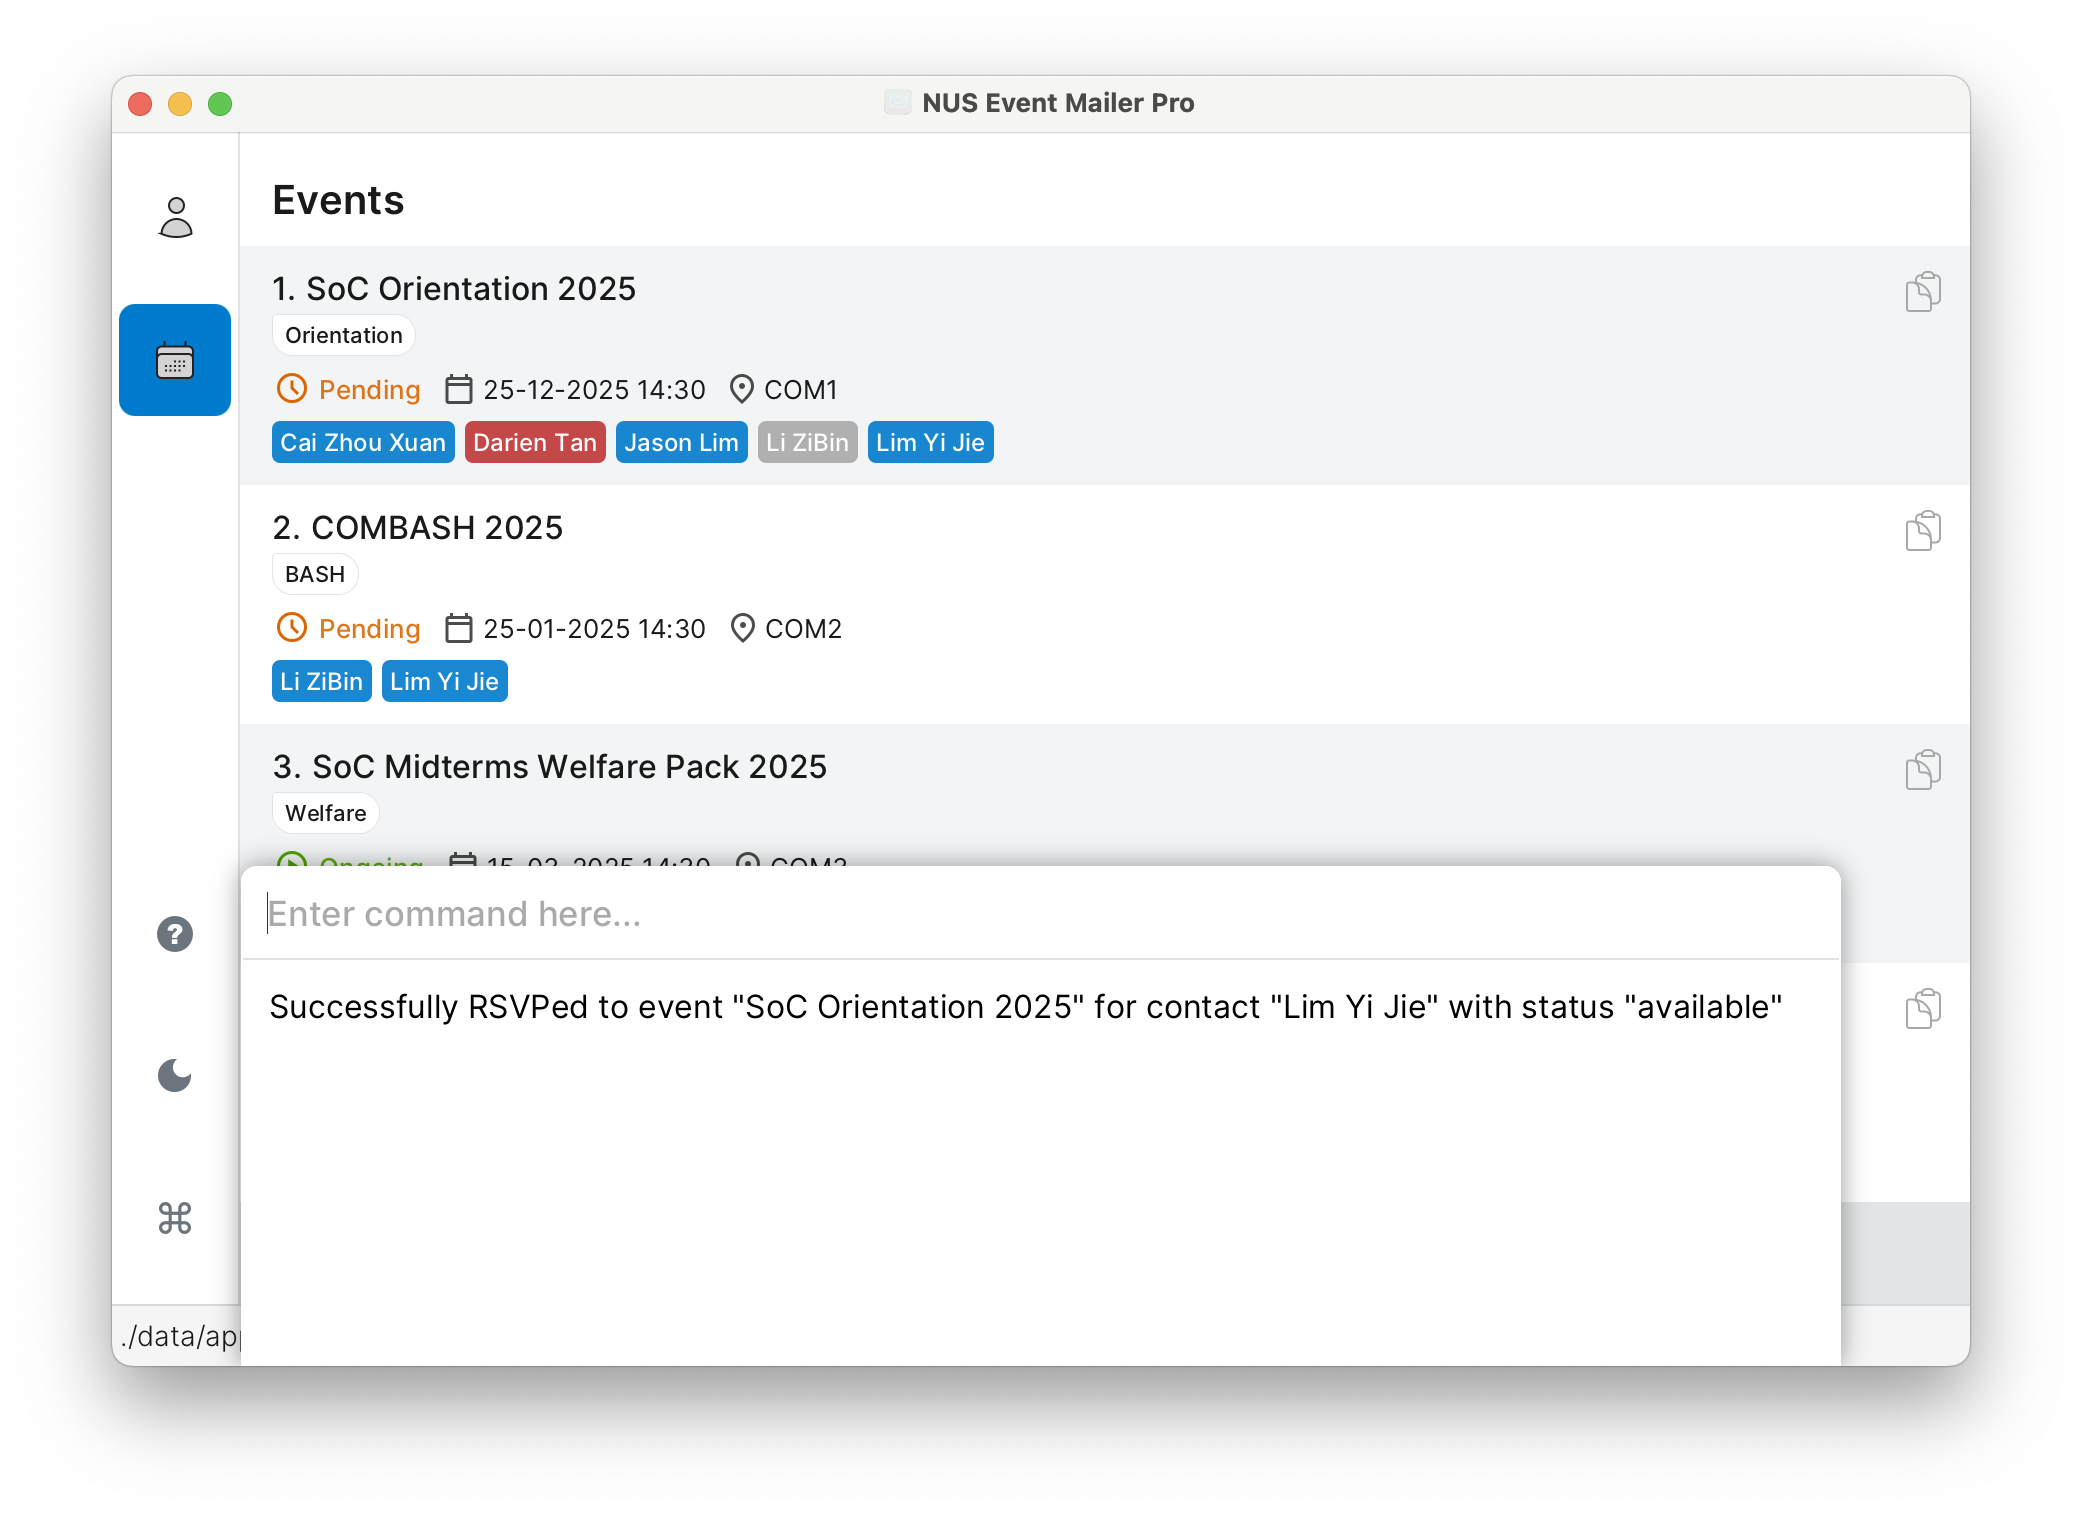
event rsvp --event 1 --contact 2 --status available
Marks contact #2 as available for event #1.
Important:
- You can find the event index in the displayed event list
- You can find the contact index in the displayed contact list
- Both indexes should be a positive number
- The contact must already be linked to the event using
event linkbefore you can update their RSVP status
Possible responses:
available- They can make it!unavailable- They can't comeunknown- Haven't decided yet
RSVP Management Tips:
- Update status as people respond to your invitations
- Helps with planning attendance and logistics
- Great for knowing who to expect at your events
- Perfect for managing large gatherings!
Format:
event rsvp --event EVENT_INDEX --contact CONTACT_INDEX --status STATUS
Screenshot Example:
3.9 event show
Check your guest list for any event:
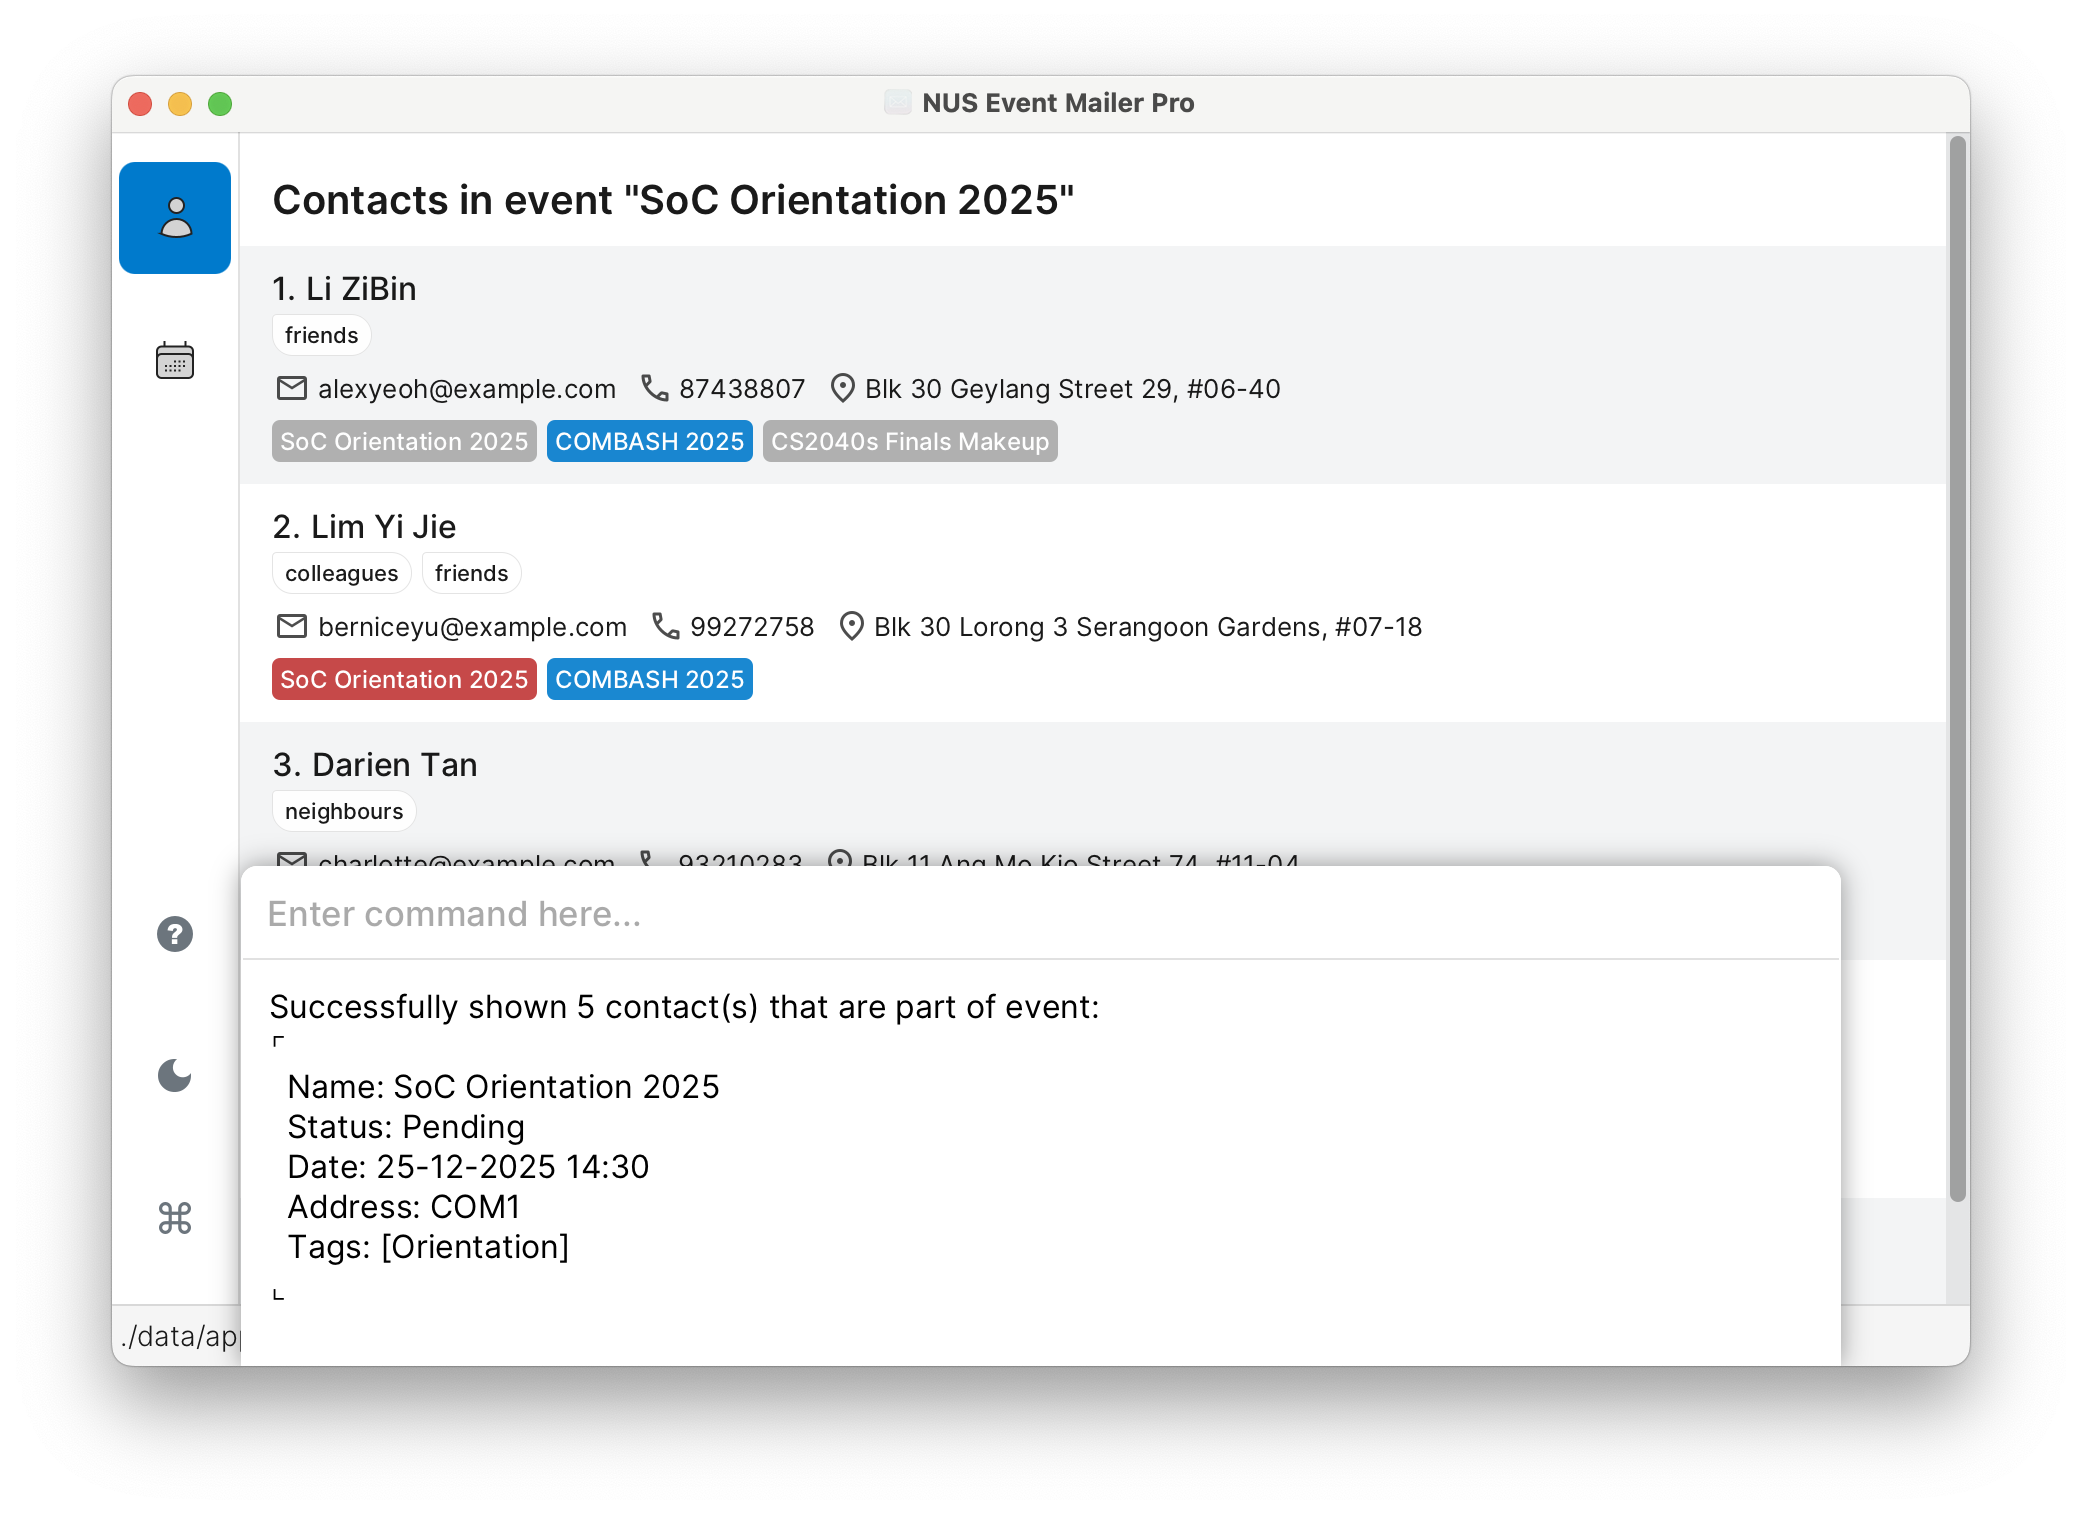
event show 1
Shows everyone invited to event #1.
Important: You can find the index of the event in the currently displayed event list. The index should be a positive number.
Note: Similar to contact find, the contact indexes will likely change. Remember to use these displayed index numbers instead when running commands on the found contacts.
Why This is Helpful:
- See contact details of everyone invited
- Know who to expect at your event
- Helps with planning seating, food, etc.
- Great for getting a quick overview!
Format:
event show INDEX
Screenshot Example:
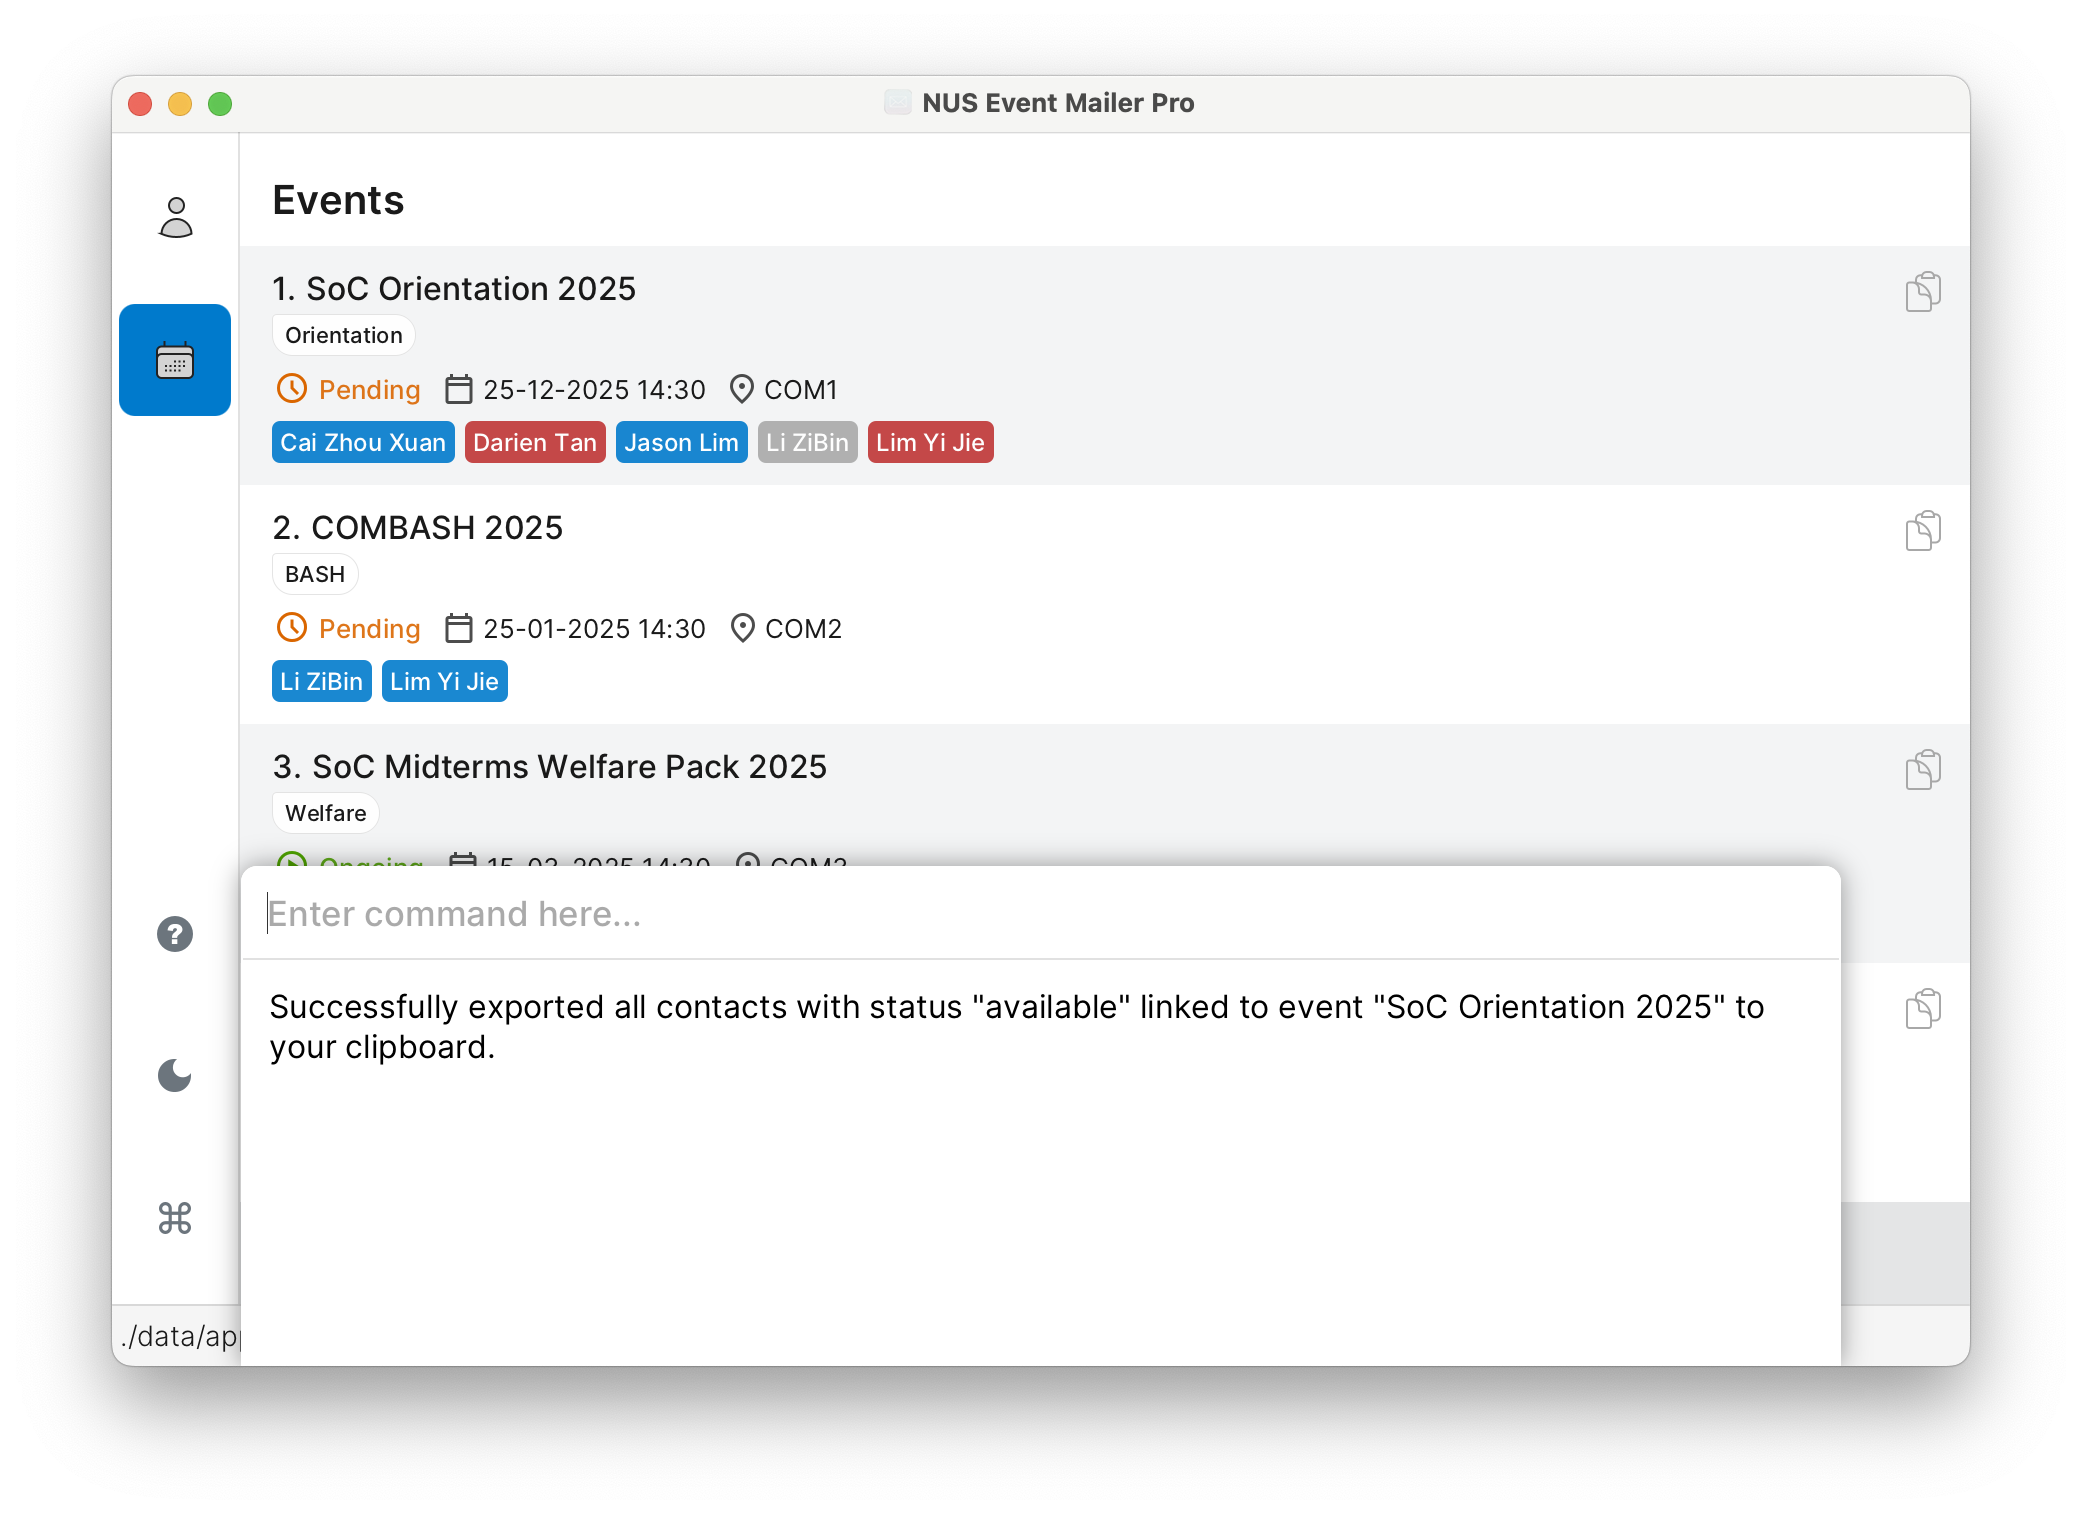
3.10 event export
Quickly copy all contacts that has status AVAILABLE from an event to your clipboard.
event export 1
This copies all contacts who are available from event #1.
You can also copy contacts with a different status:
event export 2 --status unavailable
This copies all contacts who are unavailable from event #2.
Important: You can find the index of the event in the currently displayed event list. The index should be a positive number.
Perfect For:
- Pasting into emails or messages
- Sending reminders or updates
- Sharing contact information
- You can also click the file icon next to each event for quick export available contacts!
- Saves tons of time when sharing contact details
Format:
event export INDEX [--status STATUS]
Screenshot Example:
4. Your Data is Safe
4.1 Automatic Saving
Good news! The app saves everything automatically after each command. No need to save manually - you can just focus on planning your events!
4.2 Advanced: Editing Data Directly
Your information is saved in a file called appdata.json in the data folder. You can edit this file directly if you're comfortable with it.
Warning for Advanced Users:
- Make a backup before editing!
- If the format becomes invalid, the app will start with empty data
- A file with the invalid format will be saved as
appdata.json.corrupt.<timestamp>in the data folder - To view the contents this file, open the file with any editor file (e.g. Notepad, VSCode)
- A file with the invalid format will be saved as
- Some edits might cause the app to behave strangely
- Only edit if you're confident you can do it correctly
5. Frequently Asked Questions
Q: How do I check my Java version?
A: To verify your Java version:
Open a terminal and enter
java -versionYou should see an output similar to this format:
 xxxx version "17.0.x"
 xxxx SE Runtime Environment (build 17.0.x+xx)
 xxxx 64-Bit Server VM (build 17.0.x+xx, mixed mode, sharing)
Note that what's displayed in the
xxxxcan be different depending on your Java distribution, but as long as the version number is 17, you're good to go!If the command is not recognised or the version is less than 17: Follow this guide for installation.
After installation, type
java -versionto verify the correct version.
Q: How do I navigate to a folder using cd?
A: After opening the terminal, type cd followed by the path to the folder where you saved the app. You can get the folder path in different ways depending on your OS:
- Windows: Open the folder in File Explorer, click on the address bar, copy the path, and paste it after
cdin the terminal. - Mac: Open the folder in Finder, right-click on the folder, hold the Option key, and select "Copy [folder name] as Pathname". Then paste it after
cdin the terminal. - Linux: This will depend on your file manager, but generally, you can right-click on the folder and find an option to copy the path.
Q: How do I move my data to another computer?
A: Install the app on the new computer and copy your old data file over the new empty one.
Q: The app window disappeared! What do I do?
A: If you use multiple screens, try closing and reopening the app. If that doesn't work, delete the preferences.json file.
Q: Can I edit the data file directly?
A: Yes, but be very careful! Always make a backup first. See the warning above.
6. Known Issues
- Multiple screens: If you move the app to a second screen and then use only one screen, the app might open off-screen. Delete
preferences.jsonto fix this. - Graphical glitches: You may experience some graphical glitches when selecting contacts or events by clicking or using arrow keys. We're aware of this and working on a fix!
7. Coming soon…
In our development roadmap, we plan to implement:
- Import and export options for contacts and events (CSV, Excel)
- Automated email invitations with personalized greetings
- Calendar integration (Google Calendar, Outlook)
Look forward to it!
8. Quick Command Reference
8.1 Basic Commands
| Action | Format |
|---|---|
| Get Help | help |
| Exit App | exit |
8.2 Contact Commands
| Action | Format, Examples |
|---|---|
| Add Contact | contact add --name NAME --email EMAIL [--phone PHONE] [--address ADDRESS] [--tag TAG]…e.g. contact add --name James --email james@e.com --phone 91234567 --address 123 Main Street --tag friend --tag colleague |
| Delete Contact | contact delete INDEXe.g. contact delete 3 |
| Edit Contact | contact edit INDEX [--name NAME] [--email EMAIL] [--phone PHONE] [--address ADDRESS] [--tag TAG]…e.g. contact edit 2 --name James --email jameslee@e.com |
| Find Contacts | contact find KEYWORD [MORE_KEYWORDS]… or contact find [--FIELD KEYWORD [MORE_KEYWORDS]…]…e.g. contact find --email gmaile.g. contact find --phone 9123 |
| List Contacts | contact list |
| Show Contact's Events | contact show INDEXe.g. contact show 1 |
8.3 Event Commands
| Action | Format, Examples |
|---|---|
| Add Event | event add --name NAME --date DATE [--address ADDRESS] [--tag TAG]…e.g. event add --name Meeting --date 25-12-2025 14:30 --address Room 4 --tag Work |
| Delete Event | event delete INDEXe.g. event delete 2 |
| Edit Event | event edit INDEX [--name NAME] [--date DATE] [--address ADDRESS] [--status STATUS] [--tag TAG]…e.g. event edit 1 --name New Meeting |
| Find Event | event find KEYWORD [MORE_KEYWORDS]… or e.g. event find --name Conference event find --status pending |
| List Events | event list |
| Link Contact to Event | event link --event EVENT_INDEX --contact CONTACT_INDEXe.g. event link --event 1 --contact 2 |
| Link Listed Contacts to Event | event link --event EVENT_INDEX --contact listede.g. event link --event 1 --contact listed |
| Unlink Contact from Event | event unlink --event EVENT_INDEX --contact CONTACT_INDEXe.g. event unlink --event 1 --contact 2 |
| Unlink Listed Contacts from Event | event unlink --event EVENT_INDEX --contact listede.g. event unlink --event 1 --contact listed |
| RSVP to Event | event rsvp --event EVENT_INDEX --contact CONTACT_INDEX --status STATUSe.g. event rsvp --event 1 --contact 2 --status available |
| Show Event's Contacts | event show INDEXe.g. event show 1 |
| Export Event Contacts | event export INDEX [--status STATUS]e.g. event export 1event export 1 --status available |
9. You're All Set!
Congratulations! You now know everything about using NUS Event Mailer Pro.
Remember:
- Type
helpanytime you need a reminder - Your data saves automatically
Happy event planning!